Add New User
Select Add New Users from inside the Edit Users menu.
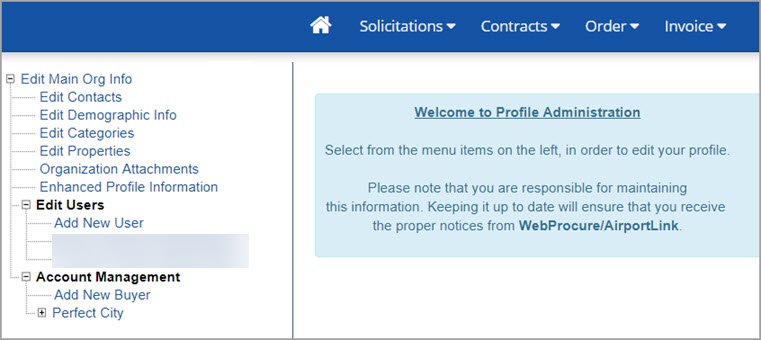
The New User page opens:
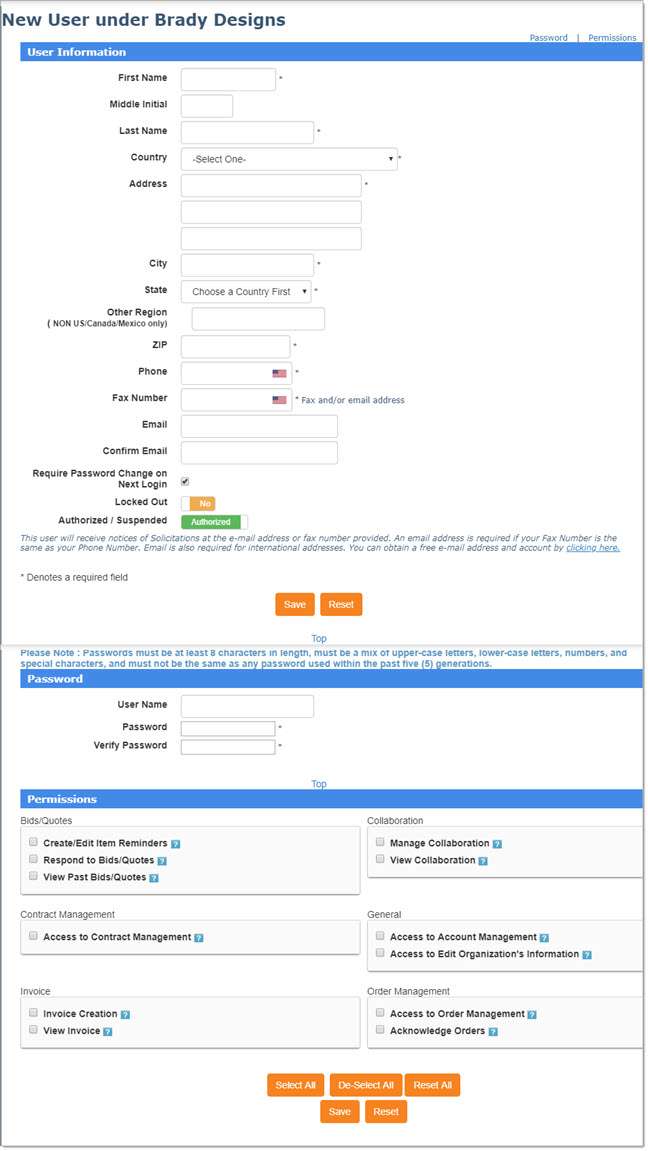
In the upper right corner, two links are available: Password and Permissions
This page is broken into an initial three sections. Once the user profile is saved, a fourth section will display.
Each one is discussed below.
User Information
The required information fields are noted with an asterisk (*).
Enter in all the information for the user.
Be aware that the user will receive notices of solicitations at the e-mail address or fax number provided.
An e-mail address is required if the Fax Number is the same as the Phone Number.
The e-mail field is also required for international vendors.
Status
Located near the bottom of the User Information section are fields and information relating to the user's access and status.

-
Required Password Change on Next Login - Check this box to force the user to change their password the next time they log into the application.
-
Locked Out - This toggle switch identifies whether the user is currently locked out of the system, Yes or No.
If the user has been locked out, you may toggle the setting to allow the user to login again. -
Authorized / Suspended - This toggle switch controls whether the user is authorized to use the system or if the user has been suspended by an Administrator.
You can change a user's profile to Suspended, should their access to WebProcure be placed on hold or removed.
This Status of Suspended will also occur automatically if they lock their account due to a number of unsuccessful log in attempts.
Password
Create the User Name and Password for the new user.
We recommend using the person's first initial and last name. (for example: jsmith)
However, the User Name must be unique in the WebProcure system, if the first initial and last name combination is not unique, consider using full name or adding numbers, etc.
If the User Name is not unique, an error message will display at the top of the page in red.

When the user logs on to the system the first time, they will use the password you create.
Upon a successful login, the user will be prompted to create a new password that is meaningful to them.
The password field is case sensitive; therefore, if capitalization is used when creating the new password, the same capitalization must be repeated during the log on process.
NOTE: Passwords have to be at least eight characters in length and cannot contain the user name or the word 'password'. Additionally, the password must contain a mix of upper and lowercase letters, numbers, and special characters. Passwords cannot be the same as any of the five previous passwords.
Permissions
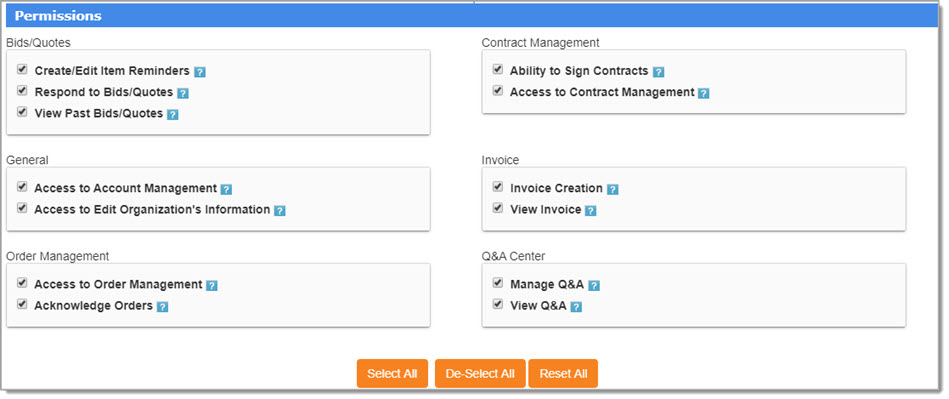
Following are the permissions available for assignment to a new user's profile:
Bid / Quotes
-
Create/Edit Item Reminders - Allows users to create and edit Item Reminders also known as Supplier Notes.
-
Respond to Bids / Quotes - Allows users to respond to Formal (Bids) and Informal (Quotes) Solicitations.
See Important message below.
IMPORTANT: When the permission to Respond to Bids/Quotes is assigned to a new user or added to an existing user, an advisory message will display:
“This permission should only be granted to actual persons, not ‘generic’ users or accounts. This permission grants the user the ability to respond on behalf of your organization, legally binding your company to the response. The user’s unique login serves as an electronic signature for such transactions in the system. Click ‘Continue’ to verify your understanding and grant the user this permission. Otherwise, click ‘Cancel’.
By selecting Continue, your organization is acknowledging that this user has permission to respond to a solicitation on your behalf. Those solicitation responses will be considered as ‘electronically signed’ by your organization.
- View Past Bids / Quotes - Allows users to view finalized or closed solicitations.
Contract Management
-
Ability to Sign Contracts - For those organizations that have enabled electronic contract signature capabilities, this permission will grants vendor users with the ability to perform that electronic signing. Currently we use the DocuSign interface.
-
Access to Contract Management - Allows vendor users to view Contracts that have been awarded to your vendor organization. Users with this assigned permission will also have visibility into the same listing of contracts that appear on the buying organization's respective Public Contract Board.
General
-
Access to Account Management - Allows users to access the Opportunity Management area to manage the regions that the organization wishes to do business with and manage buying organization relationships.
-
Access to Edit Organization's Information - Allows users to access Profile Management and perform edits to the organization profile and the user profiles.
Invoice
-
Invoice Creation - Enable the vendor portal user to create/submit invoices on behalf of the supplier organization.
-
View Invoice - Grant the vendor portal user to view existing invoices for the supplier organization.
Collaboration
-
Manage Collaboration - Allows users to post questions to the Questions & Answers section of the Collaborate page. It also allows users to view the Bulletin Board topics. For more information. go to the Collaborate topic.
-
View Collaboration - Allow users to view the Questions & Answers as posted by suppliers and buying organizations for a solicitation. For more information. go to the Collaborate topic.
Order Management
-
Access to Order Management – Users with this permission will see the Orders section on the landing page as well as access the Orders listing page. This permission is required for all users who are responsible for viewing and managing all purchase orders and their related attachments, if any.
-
Acknowledge Orders – Users with this permission will allow the user to acknowledge an order or flag the order as pending.
Simply check the box next to the permission that should be assigned to the new user.
To assign all displayed permissions to the new user, click Select All.
To remove all assigned permissions from the new user, click De-Select All.
Reset All clears assigned permissions and reverts to last saved settings.
Reset clears all entered data and assigned permissions without saving.
Click Save to maintain the changes.
New User Added
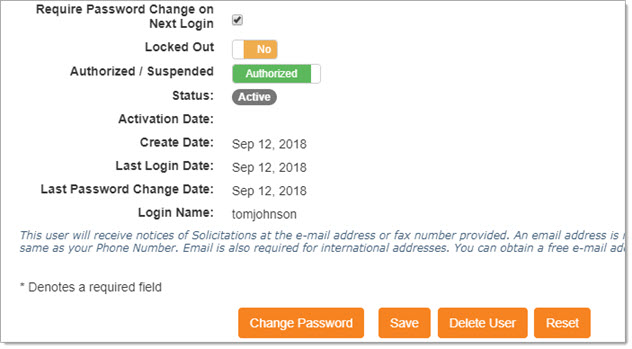
Once the new user is saved, the page will refresh to display additional action buttons and fields.
-
Required Password Change on Next Login - By default, this box is automatically checked.
This means upon a successful login, the user will be prompted to create a new password that is meaningful to them. -
Locked Out - This toggle switch identifies whether the user is currently locked out of the system, Yes or No.
If the user has been locked out, you may toggle the setting to allow the user to login again. -
Authorized / Suspended - This toggle switch controls whether the user is authorized to use the system or if the user has been suspended by an Administrator.
You can change a user's profile to Suspended, should their access to WebProcure be placed on hold or removed.
This Status of Suspended will also occur automatically if they lock their account due to a number of unsuccessful log in attempts. -
Status - The user's current status displays as a badge; you cannot manually change a user's account Status to Active.
The user will first need to log on and create a password of their own. The system will then automatically update their profile Status to Active.
Additional attributes are read-only:
-
Activation Date - If the user is Inactive, a new Activate button will be visible, otherwise, this field remains blank.
You may select this button to set the user as Active and this action will populate the Activation Date field. -
Create Date - Date the user account was created.
-
Last Login Date - Date the user last logged into the application.
-
Last Password Change Date - Date the user last changed their password.
-
Login Name - The user's username to access WebProcure.
Once the new user is added, their name will appear inside the Edit Users section of the menu tree.
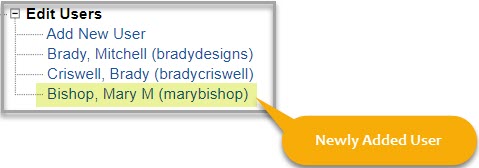
To perform edits, select their hyper linked name.
See the Edit Existing User topic to learn more.
Delete User
To remove the newly added user, simply click Delete User.
A confirmation message will display
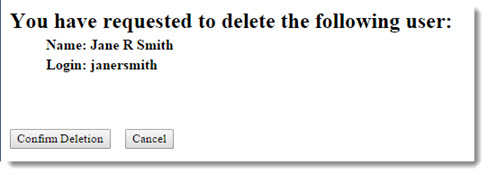
To proceed with removing the user from the application, click Confirm Deletion.
To end the deletion process and keep the user's profile in the system, click Cancel.
