Invoice Workflow
Contents
- Build Invoice Workflow Rule
- Enable Approval Rule
- Approval Steps
- Rule Order
- Reject Recipient
- Workflow
- Supplier Approver
- PO Total Tolerance Approval
- Org Level Approver
- Invoice Total Approver
- Invoice Two-Way
- Vendor Status Approval
- Vendor Validation Approval
- Vendor eInvoice Approval
- Invoice Account Segment Approval
- Org Invoice Total Threshold Approval
- PO Unit Price Tolerance Approver
- Vendor Invoice Match With Threshold
- PO Line Item Quantity Rule
- Reset Workflow
- Validations When Configuring Auto-Rule Workflows
The fourth option from the Workflow menu under Administration is the Invoice Workflow link.

Select this option to establish rules for invoice workflow and matching.
The Invoice workflow info page opens:

Each section of the page is discussed below.
Build Invoice Workflow Rule
Enable Approval Rule
Click the Enabled check box to activate an Approval Rule.
Approval Steps
By default the Approval Steps type is Serial. The alternate option is Parallel.
-
Serial - Approvals occur one after another. Each approval is completed in a designated order.
An invoice will not be available to Approver B until Approver A approves it. -
Parallel - Approval occurs independently of other approvals.
The invoice is sent to multiple approvers at the same time.
Rule Order
To change the order of how the Invoice approval rules are launched, use the Rule Order column.
Enter a numeric value for the approval rule in the Rule Order box.
The value entered determines in which order the rule will be processed.
For example, Rule Order 1 is processed before Rule Order 2 and Rule Order 3, etc.
In the following image, the Tolerance Approver rule, if triggered, would be the first in the workflow path and then the Invoice Two-Way match approval rule as the Rule Number is 2.

Using the same image above, if the Invoice Two-Way rule needed to be the first rule that launches in the Invoice workflow, you would switch the numbers in the Rule Order column and make Invoice Two-Way number 1 and Tolerance Approver number 2.
NOTE: Auto-rules should be configured before any manual workflow approvals and auto-rules should not be in parallel with the manual approval rules. Before configuring workflow, please set the correct rule orders for the workflow rules.
Be sure to select Save at the bottom of the page to save your modified Rule Order.
Reject Recipient
The Reject Recipient column contains a toggle switch for each Approval Rule.
By default the toggle will be set to Buyer, however, you may click the switch to change it to Supplier.

Based on this toggle setting, when a supplier-entered invoice is rejected, the invoice rejection notification will be sent to the Buyer or Supplier.
This includes manual- and auto-rejections on supplier-entered invoices for integrated suppliers and those that utilize the Vendor Portal.
NOTE: The Reject Recipient switch does not applyto buyer-entered invoices.
Toggle Switch Set to Buyer
When the toggle switch is set to Buyer, and a supplier-entered invoice is rejected back to the buyer, the user that receives the notification will depend on whether Central Invoice Processing is used by your organization.
-
If Central Invoice Processing is enabled, the rejection notification will route to the designated person for resolution.
-
If Central Invoice Processing is disabled. the rejection notification will route to the user who generated the Request/Purchase Order for resolution.
Toggle Switch Set to Supplier
When the toggle switch is set to Supplier, and a supplier-entered invoice or integrated supplier invoice is rejected back to the supplier, the supplier contact who has been designated as the Remittance Contact, will receive the notification.
If a Remittance Contact does not exist, it will default to use the Main Contact.
Supplier-Entered Invoice Behaviors
The following behaviors apply to supplier-entered invoices:
-
When a supplier-entered invoice is Auto-Rejected to Supplier, the buyer-facing Invoice Status will state: Auto-Rejected to Supplier.
-
This status is available as a filter on the Invoice/Credit/Payment Voucher List page.
-
-
When a supplier-entered invoice is manually Rejected by an approver, the buyer-facing Invoice Status will state: Rejected to Supplier.
Invoice Status inside of the Vendor Portal:
-
Supplier-entered invoices that are Rejected back to the buyer will display as Under Review within the Vendor Portal.
-
Supplier-entered invoices that are Rejected, through auto-rejection or manually, by an approver, will display as Rejected within the Vendor Portal.
Workflow
There are over twenty invoice-related approval rules available.
Two are configured at the user-level:
-
Supplier Approver
-
Invoice Total Approver
See the Invoice Workflow - User Level topic.
The remaining workflows are configured at the organization level:
-
Supplier Approver - This rule is configured in the user's profile. See Edit Users topic for more information.
-
PO Total Tolerance Approver - Enter the tolerance (percentage) for Invoices (+/-) percent of the original invoice that may be adjusted by the selected approver or approval group without having to have the invoice re-issued. Also, you may enter a Not to Exceed value may be entered to limit the amount that this approver or approval group can approve. See PO Total Tolerance Approval for more information.
-
Org Level Approver 1 through 10 - Designate one or more organization-level approvers or approval groups to approve invoices.
Use one rule per approver/approval group. See Org Level Approver topic for more information. -
Invoice Total Approver - This rule is configured in the user's profile. See Edit Users topic for more information.
-
Invoice Two-Way - Select the approver that will approve two-way matches between the purchase order and the invoice.
See Invoice Two-Way Approver topic for more information. -
Vendor Status Approval - This approval rule allows you to auto-reject an invoice or launch a workflow based on a vendor status of Declined and/or Pending.
See Vendor Status Approval topic for more information. -
Vendor Validation Approval - This approval rule allows you to auto-reject an invoice if a vendor has failed one or more of your organization's vendor validations.
See Vendor Validation Approval topic for more information. -
Vendor eInvoice Approval - This approval rule allows you to auto-reject an invoice if is not enabled as an eInvoice Vendor.
See Vendor E-Invoice Status Approval topic for more information. -
Invoice Account Segment Approval - This approval rule allows you to launch a workflow based on Segment Name and Segment Value.
See Invoice Account Segment Approval topic for more information. -
Org Invoice Total Threshold Approval - This approval rule allows you to launch a workflow based on the total amount of the invoice and the threshold limit of designated approvers.
See Org Invoice Total Threshold Approval topic for more information. -
PO Unit Price Tolerance Approver - This approval rule allows you to select how the system processes invoices with line item Unit Prices that exceed line item Unit Prices on associated Purchase Orders.
See PO Unit Price Tolerance Approver topic for more information. -
Vendor Invoice Match With Threshold - This approval rule allows you to set a threshold amount that will require three-way matching for those vendors who have not been designated as two-way match vendors on.
-
PO Line Item Quantity Rule - This approval rule will be triggered if the quantity on each invoice line item, plus all previous invoice line items, exceeds the purchase order line item quantity. This rule impacts all existing invoice entry methods, including buyer-entered, supplier-entered, imported invoices, and invoices transmitted from integrated suppliers.
NOTE: If the purchase order is set to Receive by Amount, then this validation will not be performed.
Supplier Approver
This approval rule is configured inside the user's profile.
See Edit Users topic for more information.
PO Total Tolerance Approval
Use the PO Total Tolerance Approval rule to enter a tolerance (percentage) for Invoices (+/- percent of the original invoice that may be adjusted by the selected user without reissuing the Invoice).
Also, you may set a Not to Exceed value to limit the amount that this approver or approval group can approve.
Click Configure. The PO Total Tolerance Approval modal window opens:

Enter a numeric value into the Tolerance (Percentage) field. This is the +/- percentage of the original invoice that may be adjusted by the selected approver or approval group without having the invoice re-issued.
Enter a numeric value into the Not to Exceed field which determines the highest value that the selected approver or approval group can approve.
Click Configure Workflow
A modal window opens.
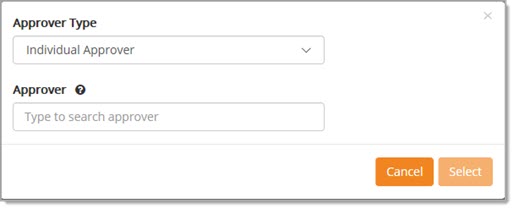
Use the Approver Type drop-down menu to select whether the approver will be an Individual Approver or Approval Group.
Begin entering the name of the individual or group into the Approver field.
The system will automatically retrieve users or groups that match your entered text.
At least two or more characters will need to be entered for the system to retrieve results.
Use two asterisks ** to retrieve a complete listing.

Select the desired name or group.
Click Select.
The user will be added to the Tolerance Approval page.

NOTE: Only one approver or approval group may be assigned for this approval rule. To choose an alternate approver or approval group, you must first clear the existing approver or approval group by clicking the X in the upper right corner of the blue box and repeat above steps to search and select new approver or approval group.
Click Save to commit your changes/entry.
Click Close to close the window without committing your changes or entries.
To remove an existing approver or approval group, click the X located in the upper right corner of the blue box and click Save.
Org Level Approver
Up to ten different organization-level approvers/approver groups may be configured.
Use one rule per approver/approval group.
Click Edit Approvers button to open the Invoice Org Approver modal window.

Click Start Workflow to search and select an organization level approver or approval group.
A modal window opens.
Use the Approver Type drop-down menu to select whether the approver will be an Individual Approver or Approval Group.
Begin entering the name of the individual or group into the Approver field.
The system will automatically retrieve users or groups that match your entered text. At least two or more characters will need to be entered for the system to retrieve results.
Use two asterisks ** to retrieve a complete listing.
Select the desired name or group.
Click Select.
The selected approver or approval group will display on the Invoice Org Approver page.

NOTE: Only one approver or approval group may be assigned for this approval rule. To choose an alternate approver or approval group, you must first clear the existing approver or approval group by clicking the X in the upper right corner of the blue box and repeat above steps to search and select new approver or approval group.
Click Save to commit your changes/entry.
Click Close to close the window without committing your changes or entries.
To remove an existing approver or approval group, click the X located in the upper right corner of the blue box and click Save.
Invoice Total Approver
This approval rule is configured inside the user's profile.
See the Edit Users - Invoice Workflow topic for details.
Invoice Two-Way
Use the Invoice Two-Way Approval Rule to select the user that will approve two-way matches between the Invoice and Purchase Order.
NOTE: A two-way match matches the original Purchase Order with the supplier's Invoice. A three-way match matches the original Purchase Order with the supplier's Invoice and the Purchase Order Receipt.
Click Edit Approvers to open the Invoice Two-Way Approval modal window.

Click Start Workflow to search and select a invoice two-way approver or approval group.
A modal window opens.
Use the Approver Type drop-down menu to select whether the approver will be an Individual Approver or Approval Group.
Begin entering the name of the individual or group into the Approver field.
The system will automatically retrieve users or groups that match your entered text.
At least two or more characters will need to be entered for the system to retrieve results.
Use two asterisks ** to retrieve a complete listing.
Select the desired name or group.
Click Select.
The selected approver or approval group will display on the Invoice Two-Way Approval page.

NOTE: Only one approver or approval group may be assigned for this approval rule. To choose an alternate approver or approval group, you must first clear the existing approver or approval group by clicking the X in the upper right corner of the blue box and repeat above steps to search and select new approver or approval group.
Click Save to commit your changes/entry.
Click Close to close the window without committing your changes or entries.
To remove an existing approver or approval group, click the X located in the upper right corner of the blue box and click Save.
Vendor Status Approval
The Vendor Status Approval rule allows you to set a trigger and a corresponding workflow action based on a vendor's status.
Select Configure to open the Vendor Status Approval modal window.

In the Vendor Status section, choose one or both vendor statuses:
-
Pending
-
Declined
In the Workflow Action section choose the workflow behavior for one or both statuses:
-
Auto-Reject (Default selection)
-
Approval
If you wish for an invoice to be auto-rejected based on if a vendor's status is Pending and/or Declined, leave the Auto-Reject button selected and click Save.
NOTE: Auto-rules should be configured before any manual workflow approvals and auto-rules should not be in parallel with the manual approval rules. Before configuring workflow, please set the correct rule orders for the workflow rules.
To configure a workflow approver for invoices in which a vendor's status is Pending and/or Declined, select the Approval button.
Once the Approval button is selected, the Configure Workflow button displays and is active.

Click Configure Workflow to open the approver selection modal window:
Use the Approver Type drop-down menu to select whether the approver will be an Individual Approver or Approval Group.
Begin entering the name of the individual or group into the Approver field.
The system will automatically retrieve users or groups that match your entered text. At least two or more characters will need to be entered for the system to retrieve results.
Use two asterisks ** to retrieve a complete listing.
Select the desired name or group.
Click Select.
The selected approver or approval group will display on the Vendor Status Approval page.

NOTE: Only one approver or approval group may be assigned for this approval rule. To choose an alternate approver or approval group, you must first clear the existing approver or approval group by clicking the X in the upper right corner of the blue box and repeat above steps to search and select new approver or approval group.
Click Save to commit your changes/entry.
Click Close to close the window without committing your changes or entries.
To remove an existing approver or approval group, click the X located in the upper right corner of the blue box and click Save.
Vendor Validation Approval
Use the Vendor Validations Approval rule to select one or more vendor validations as a trigger whereas, if a vendor fails a validation, an invoice from that vendor is auto-rejected.
Select Configure to open the Vendor Validations Approval modal window.

Check the box next to one or more vendor validations. These options will vary based on your organization.
In the above sample image, the Division of Purchasing Suspension/Debarment was selected.
If a vendor fails this particular vendor validation, the workflow action taken will be to Auto-Reject any invoices that come in from a vendor with this failed validation.
Auto-Reject is the default workflow action for any validations that are selected as triggers.
NOTE: Auto-rules should be configured before any manual workflow approvals and auto-rules should not be in parallel with the manual approval rules. Before configuring workflow, please set the correct rule orders for the workflow rules.
Click Save to commit your changes/entry.
Click Close to close the window without committing your changes or entries.
Vendor eInvoice Approval
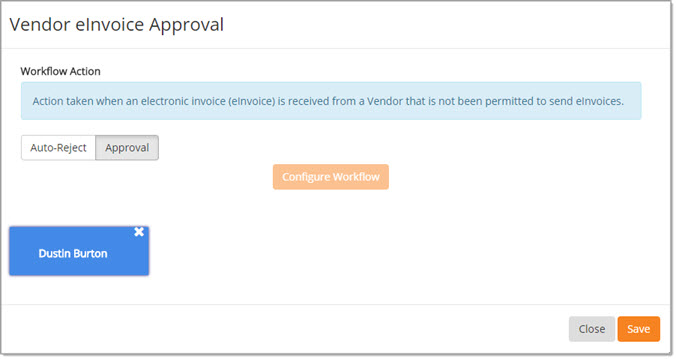
The Vendor eInvoice Approval rule allows you to set a trigger and a corresponding workflow action if an electronic invoice (eInvoice) is received from a vendor that has not been permitted to send eInvoices.
Select Configure to open the Vendor eInvoice Approval modal window.

Choose your Workflow Action:
-
Auto-Reject - To Aut0-Reject any invoices that come in from a vendor that has not been permitted to send eInvoices.
Auto-Reject is the default workflow action for the single available trigger. -
Approval - To configure a workflow approver for invoices in which a vendor's has not been permitted to send eInvoices, select the Approval button.
Once the Approval button is selected, the Configure Workflow button displays and is active.
Click Configure Workflow to open the approver selection modal window:
Use the Approver Type drop-down menu to select whether the approver will be an Individual Approver or Approval Group.
Begin entering the name of the individual or group into the Approver field.
The system will automatically retrieve users or groups that match your entered text.
At least two or more characters will need to be entered for the system to retrieve results.
Use two asterisks ** to retrieve a complete listing.

Select the desired name or group.
Click Select.
The selected approver or approval group will display on the Vendor eInvoice Approval page.
NOTE: Only one approver or approval group may be assigned for this approval rule. To choose an alternate approver or approval group, you must first clear the existing approver or approval group by clicking the X in the upper right corner of the blue box and repeat above steps to search and select new approver or approval group.
Click Save to commit your changes/entry.
Click Close to close the window without committing your changes or entries.
To remove an existing approver or approval group, click the X located in the upper right corner of the blue box and click Save.
Invoice Account Segment Approval
The Invoice Account Segment Approval rule allows you to set a trigger and a corresponding workflow action based on accounting Segment Name and Segment Value.
Select Configure to open the Configure Invoice Account Segment Approver window.

Locate the Segment Name to which you would like to assign an approver. Next, enter the corresponding Segment Value that will be used as a trigger to launch the workflow. If known, it may be keyed directly into the field. Type-ahead search functionality allows the system to retrieve matching values as characters are entered.
If you need to search and select a Segment Value, select the Magnifying Glass ![]() . This opens the Value Search window from which you may set search criteria.
. This opens the Value Search window from which you may set search criteria.
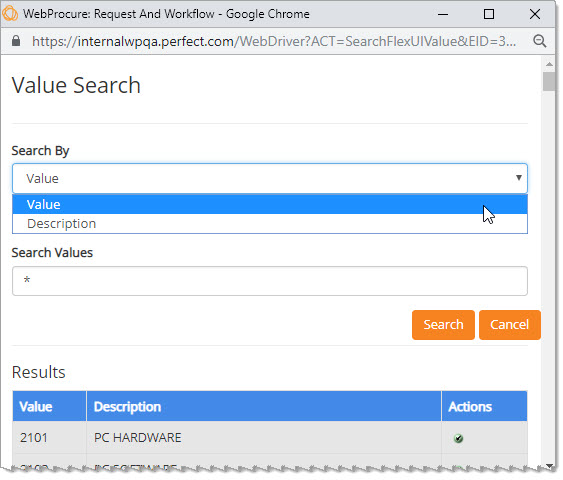
From the Search By drop-down menu, select either Value or Description.
In the Search Values field, enter a full or partial string to return values that begin with the characters entered. Use two asterisks ** to retrieve a complete listing.
Click Cancel to close the window without completing the search.
Click Search to retrieve a list of search results.
From the displayed list, click the Action ![]() icon to select a Value / Description. This returns you to the Configure Invoice Account Segment Approvers window, where the selected Segment Value has been added.
icon to select a Value / Description. This returns you to the Configure Invoice Account Segment Approvers window, where the selected Segment Value has been added.
Next, select the Gear ![]() icon to configure the workflow. This opens the Configure Invoice Account Segment Approvers window, from which approvers / approval groups may be searched and selected.
icon to configure the workflow. This opens the Configure Invoice Account Segment Approvers window, from which approvers / approval groups may be searched and selected.
Click Select Approver to open the approver selection window.

Use the Approver Type drop-down menu to select whether the approver will be an Individual Approver or Approval Group.
Begin entering the name of the individual or group into the Approver field.
The system will automatically retrieve users or groups that match your entered text. At least two or more characters will need to be entered for the system to retrieve results.

Select the desired name or group.
Click Select.
The selected approver or approval group will display on the Configure Invoice Account Segment Approvers page.
NOTE: To add an additional approver or approval group either before or after the existing step, select a directional arrow from the left or right edge of the blue box. Next, repeat the above steps to search and the select new approver or approval group. To remove an existing approver or approval group, click the X in the upper right corner of the blue box.
Click Save to commit your changes/entry.
Click Cancel to close the window without committing your changes or entries.
Once configured, The approver will display on the Invoice Approver page, located in the Workflow area of the Admin module.
NOTE: This workflow inherits from parent to child and may be overridden at the child org level.
Org Invoice Total Threshold Approval
The Org Invoice Total Threshold Approval rule allows invoices to move through a workflow based on the invoice total amount and the threshold limit of designated approvers.
Select Configure to open the Org Invoice Total Threshold Approval Limit window.

The window contains a table listing approvers in ascending order by approval limit. If no approvers have been designated, the list will be blank.
To assign an approver to the list, select the Add button. This launches a pop-up window, from which an approver may be selected.

Use the Approver Type drop-down menu to select an Individual Approver or Approval Group.
Begin entering the name of the individual or group in the Approver field.
The system will automatically retrieve users or groups that match your entered text. At least two or more characters will need to be entered for the system to retrieve results.
Select the desired name or group.
Click Select.
The selected approver or approval group will display on the Org Invoice Total Threshold Approval Limit page.
Enter an approval limit in the Org Invoice Total Threshold Limit field.

Next, to sort approvers in ascending order by approval limit, a drag-and-drop action may be performed on table rows.
Numbers displayed in the Sequence column will update automatically as rows are sorted.
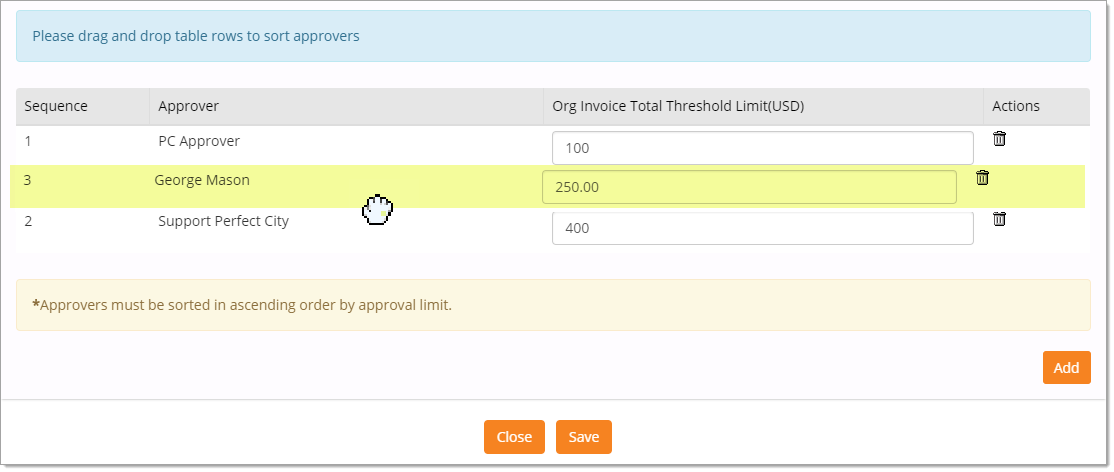
To remove an Invoice Total Value Approver from the list, select the Delete  icon. A pop-up window will alert user to ‘Click OK to confirm approver deletion, else Cancel to return back to page’.
NOTE: Clicking OK to confirm deletion returns user to the Invoice Workflow page.
Once the approval chain is built and sorted, select the Save button. A message will display confirming ‘Changes successfully saved’.

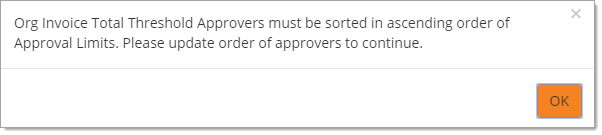
If the approver sequence is not ordered correctly, an error message will direct you to sort again.
PO Unit Price Tolerance Approver
Use the PO Unit Price Tolerance Approver rule to select how the system processes invoices with line item Unit Prices that exceed line item Unit Prices on associated Purchase Orders.
Select Configure to open the PO Unit Price Tolerance Approver modal window.

In the Workflow Action section choose the workflow behavior for one or both statuses:
-
Auto-Reject (Default selection)
-
Approval
If you wish for an invoice to be auto-rejected based on line item Unit Prices that exceed Unit Price amounts on associated Purchase Orders, leave the Auto-Reject button selected and click Save.
NOTE: Auto-rules should be configured before any manual workflow approvals and auto-rules should not be in parallel with the manual approval rules. Before configuring workflow, please set the correct rule orders for the workflow rules.
To configure a workflow approver for invoices in which line item Unit Prices exceed those on associated Purchase Orders, select the Approval button.
Once the Approval button is selected, the Configure Workflow button displays and is active.
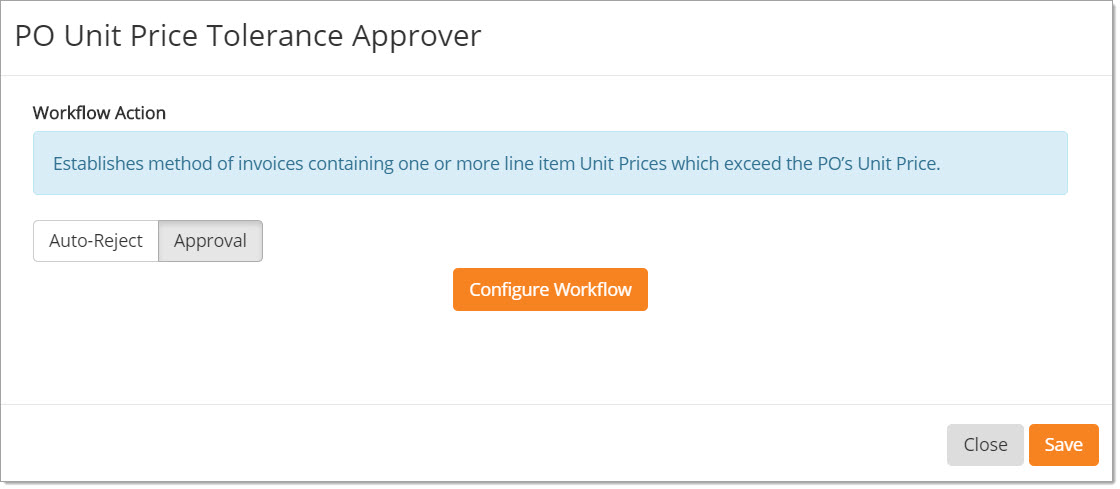
Click Configure Workflow to open the Approver selection modal window:
Use the Approver Type drop-down menu to select whether the approver will be an Individual Approver or Approval Group.
Begin entering the name of the individual or group into the Approver field.
The system will automatically retrieve users or groups that match your entered text. At least two or more characters will need to be entered for the system to retrieve results.
Use two asterisks ** to retrieve a complete listing.
Select the desired name or group.
Click Select.
The selected approver or approval group will display on the PO Unit Price Tolerance Approver page.

NOTE: Only one approver or approval group may be assigned for this approval rule. To choose an alternate approver or approval group, you must first clear the existing approver or approval group by clicking the X in the upper right corner of the blue box and repeat above steps to search and select new approver or approval group.
Click Save to commit your changes/entry.
Click Close to close the window without committing your changes or entries.
To remove an existing approver or approval group, click the X located in the upper right corner of the blue box and click Save.
Vendor Invoice Match With Threshold
The Vendor Invoice Match with Threshold Approval Rule is used to set a threshold amount that requires three-way matching for those vendors who are not explicitly designated as a two-way match vendors.
Select Configure top open the Vendor Invoice Match With Threshold modal window.
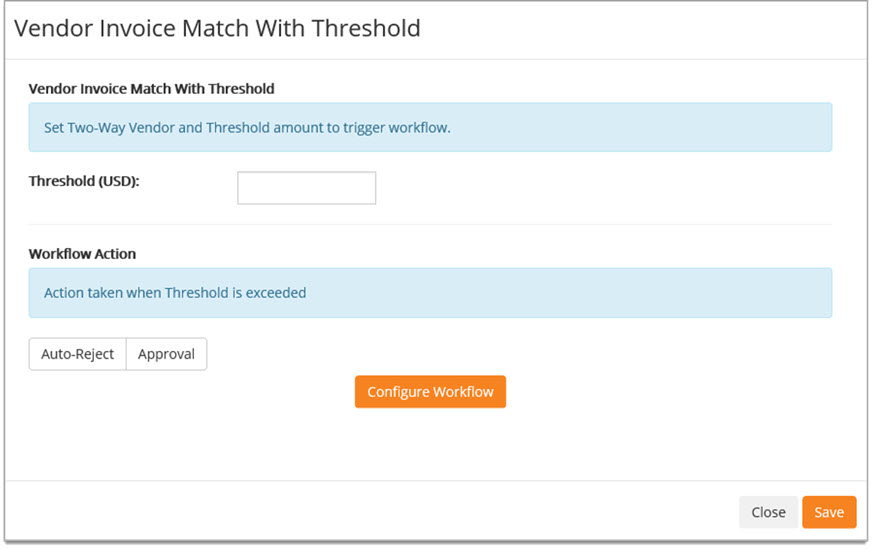
This window is broken into two sections:
Vendor Invoice Match With Threshold
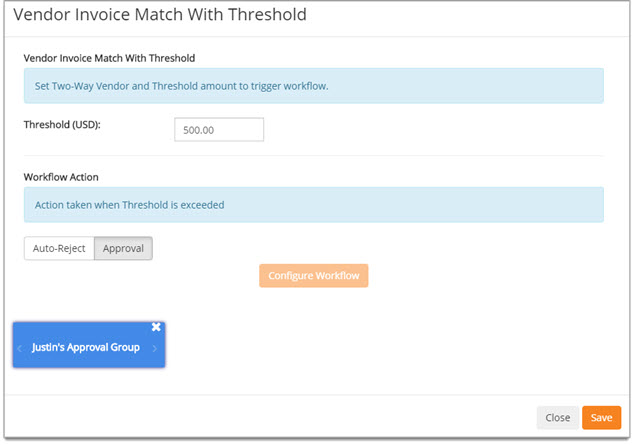
Set the Threshold amount by entering a dollar amount.
For example, if the amount is set at $500, then any invoice totals greater than $500 will require three-way matching.
Workflow Action
This section is used to determine the action that will be taken if the Threshold is exceeded.
Your options include: Auto-Reject or Approval.
-
Auto-Reject - If you choose this option, the Configure Workflow button will no longer be visible.
Be sure to save your changes.-
The Invoice Status will be set to Auto-Rejected.
-
The Invoice Match Status will already be Not Matched or Partially Matched if the invoice is auto-rejected.
-
-
Approval - If you choose this option, select the Configure Workflow button to choose an approver or approval group that the invoice will be sent for approval or rejection.
NOTE: Auto-rules should be configured before any manual workflow approvals and auto-rules should not be in parallel with the manual approval rules. Before configuring workflow, please set the correct rule orders for the workflow rules.
Use the Approver Type drop-down menu to select whether the approver will be an Individual Approver or Approval Group.
Begin entering the name of the individual or group into the Approver field.
The system will automatically retrieve users or groups that match your entered text.
At least two or more characters will need to be entered for the system to retrieve results.
Use two asterisks ** to retrieve a complete listing.
Select the desired name or group.
Click Select.
The selected approver or approval group will display on the Vendor Invoice Match With Threshold page.
The following table identifies scenarios for vendor-submitted invoices:
|
WORKFLOW RULE CONFIGURATION |
VENDOR IN TWO-WAY MATCH LIST |
BELOW THRESHOLD AMOUNT |
EQUAL TO, OR ABOVE, THRESHOLD AMOUNT |
INVOICE MATCHING STATUS |
WORKFLOW ACTION / RESULT |
|
Auto-Reject OR Approval |
Yes |
N/A |
N/A |
FULLY MATCHED, PARTIALLY MATCHED, or NOT MATCHED |
Auto-Approve |
|
Auto-Reject OR Approval |
No |
X |
|
FULLY MATCHED, PARTIALLY MATCHED, or NOT MATCHED |
Auto-Approve |
|
Auto-Reject OR Approval |
No |
|
X |
FULLY MATCHED |
Auto-Approve |
|
Auto-Reject |
No |
|
X |
PARTIALLY MATCHED |
Auto-Reject |
|
Auto-Reject |
No |
|
X |
NOT MATCHED |
Auto-Reject |
|
Approval |
No |
|
X |
PARTIALLY MATCHED |
Invoice à Configured Approver’s Approval Inbox |
|
Approval |
No |
|
X |
NOT MATCHED |
Invoice à Configured Approver’s Approval Inbox |
PO Line Item Quantity Rule
If enabled and configured, this workflow will be triggered if the quantity on each invoice line item, plus all previous invoice line items, exceeds the purchase order line item quantity. This rule will impact all existing invoice entry methods, including buyer-entered, supplier-entered, imported invoices, and invoices transmitted from integrated suppliers.
NOTE: If the purchase order is set to Receive by Amount, then this validation will not be performed.
Select Configure to open the PO Line Item Quantity Tolerance Approver window.

Choose the Workflow Action:
-
Auto-Reject - If you select, Auto-Reject, the Configure Workflow button will be hidden.
-
If the invoice contains line items that exceed purchase order line item quantity, the invoice will be auto rejected.
-
If invoice does not contain line items that exceed purchase order line item quantity, the invoice will advance to the next approval step, if applicable, or approved.
-
-
Approval - If you select Approval, the Configure Workflow button will display. Select Configure Workflow to choose an individual approver or choose an approval group.
-
If invoice contains line items that exceed purchase order line item quantity, the invoice will advance to the designated approver or approvers as set up in this workflow.
-
If invoice does not contain line items that exceed purchase order line item quantity, the invoice will advance to next approval rule, if applicable, or approved.
-
NOTE: Auto-rules should be configured before any manual workflow approvals and auto-rules should not be in parallel with the manual approval rules. Before configuring workflow, please set the correct rule orders for the workflow rules.
Click Configure Workflow to open the approver selection modal window:
Use the Approver Type drop-down menu to select whether the approver will be an Individual Approver or Approval Group.
Begin entering the name of the individual or group into the Approver field.
The system will automatically retrieve users or groups that match your entered text.
At least two or more characters will need to be entered for the system to retrieve results.
Use two asterisks ** to retrieve a complete listing.
Select the desired name or group.
Click Select.
The selected approver or approval group will display on the PO Line Item Quantity Tolerance Approver window.

Reset Workflow
Select the Reset Workflow button at the bottom of the page to discard any edits without saving.
This returns all of the workflow configurations to their previously saved state.
Validations When Configuring Auto-Rule Workflows
In order for invoice auto-rules to execute properly, they must be placed first in the workflow chain and they must be placed in parallel to each other. To assist users in properly configuring invoice workflows, the following validations will be applied to prevent invalid rule order for the Invoice Workflow.
The following error message will display if the guidelines are not followed.

The above message will display if the following guidelines are not met:
-
All auto-rule need to be before any manually configured workflow approvals.
-
If auto-rules are in parallel as the first step, there cannot be any manually configured approvals in that parallel step.
-
Parallel rules cannot be added sequentially. At least one Approval Step must be changed to Serial Approval.
Example Scenarios:
|
Scenario |
Precondition |
Rule Order |
Enable New Workflow |
Rule Order |
Result |
|
Auto-rule BEFORE the manual workflow approval. |
Auto-Reject configured for PO Total Tolerance Approver |
0 |
Org-Level Approver 2 |
1 |
Workflow is successfully saved. |
|
Auto-rule AFTER the manual workflow approval. |
Auto-Reject configured for PO Total Tolerance Approver |
1 |
Org-Level Approver 2 |
0 |
New error message displays. Workflow cannot be saved. |
|
Auto-rule PARALLEL to manual workflow approval |
Auto-Reject configured for PO Total Tolerance Approver |
0 |
Org-Level Approver 2 |
0 |
New error message displays. Workflow cannot be saved. |
|
Manual workflow approval rule BEFORE and PARALLEL to a manual workflow approval rule. |
Manual reject rule configured for PO Total Tolerance Approver |
0 |
Org-Level Approver 2 |
0 |
Workflow is successfully saved. |
|
Manual workflow approval rule BEFORE and PARALLEL to a manual workflow rule. |
Manual reject rule configured for PO Total Tolerance Approver |
1 |
Org-Level Approver 2 |
0 |
Workflow is successfully saved. |
|
Configure Auto-Reject |
Enable PO Total Tolerance Approver rule. Select Configure on PO Total Tolerance Approver – select Auto-Reject. Save . |
1 |
Org-Level Approver 2 |
0 |
New error message displays. Rule order cannot be saved. |