Schedule Reports
Contents
Schedule Published Reports allows users to schedule an ad-hoc report to be run at a particular time and/or on a particular frequency.
Access to the Schedule Reports link in the Analytics drop-down menu is driven by the Schedule Published Reports permission.

Select Schedule Reports from the Analytics menu.

The Schedule Reports window opens. In the example image below, there are no scheduled reports as of yet.

Users with the Schedule Published Reports permission will also be able to select a new Schedule Report action from the Actions ellipsis.
This option is available from the Execute > Published Reports tab on Personal, Organization, and Public Reports.
Select Schedule Report to create a schedule or run a scheduled report.

Create Schedule
Click Create Schedule to set parameters, recurrence intervals, output options and notifications.

New Schedule

The Schedule For path displays where the personal report is contained and the one in which you are scheduling.
Complete this page as follows:
Schedule Start
Check the radio button to make a selection for when you wish the report to begin.
Options include:
-
Immediately
-
On Specific Dates - Click the calendar icon to choose a starting date and time.

Use the Time Zone drop-down menu to select the desired Time Zone.
Recurrence
Use the drop-down menu to select which Recurrence type to use. Options include:
-
None - If you do not wish for this report to run on a recurring basis, leave the default selection of None.
-
Simple - To create a simple recurrence based on set minutes, hours, days and weeks, choose Simple.

-
Calendar - To create a recurrence based on months, dates, days, and specific times, choose Calendar.

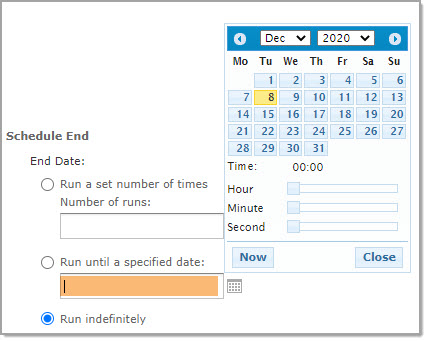
Schedule End
Choose an End Date options include:
-
Run a set number of times
-
Number of runs:
-
Enter a value in the Number of runs text box.
-
-
-
Run until a specified date
-
Use the calendar icon to select a specific date for the recurring report runs to stop running.
-
-
Run indefinitely
-
Check this box to have the report run indefinitely.
-
Holidays
Use the drop-down menu to choose the holidays in which you don't want the report to run.
Output Options
Select the Output Options tab to choose the output type and destination.

Output File Options
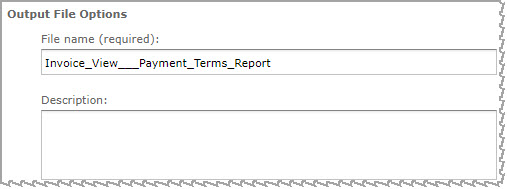
By default, the File Name pulls the report name from the Execute Reports folder.
It may be changed as needed.
NOTE: The file name cannot have any spaces.
Enter a Description of the file name in the text box. This is optional.
Time Zone
Use the drop-down menu to select your time zone.
Output Locale
Use the drop-down menu to choose the language/locale.
Formats
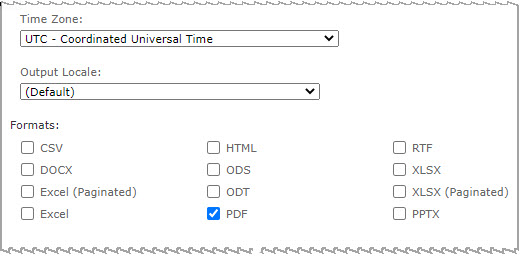
Check the boxes for one or more formats that you would like to generate the report in.
File Handling
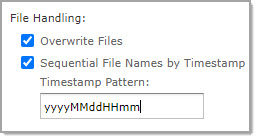
By default, the Overwrite Files check box is selected by default.
You can clear this box so that no files are overwritten.
You may also check the box to create Sequential File Names by Time stamp and then designate a Time stamp pattern.
Output Destination
Use the Output Destination section to determine where the scheduled report will be sent.
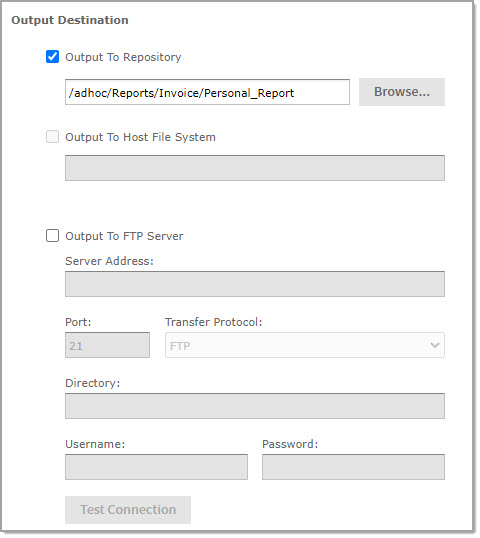
By default, the report output selection will be Output to Repository and will be the same folder that you selected the Schedule Report action from the Actions ellipsis.
NOTE: At this time, you cannot make changes to the Repository location. Also, you will be unable to select the Output to Host File System location.
Another option is Output to FTP Server. You will need all the information of the FTP Server in order to make this selection.
-
Server Address
-
Port
-
Transfer Protocol
-
Directory
-
Username
-
Password
Be sure to select Test Connection to verify your settings.
Notifications
Select the Notifications tab to configure how you would like to be notified when the report runs and the the status updates of the report.

Send Report When Scheduler Runs
Complete the left column to determine the recipient or recipients that will receive the automated notification when the scheduler is run.
-
To
-
CC
-
BCC
-
Subject
-
Message
Use commas to separate addresses.
Make a selection from the left column radio buttons. Options include:
-
Include reports as repository links in email body - This is the default selection.
-
Include report files as attachments
-
Include report files as ZIP attachment
Currently the Include HTML report in email body selection is not available.
By default, the Do not send emails for empty reports box is checked.
Clear this box if you want the email notifications to be sent even when the report does not include any content.
Send Job Status Notifications
Complete the right column to determine the recipient or recipients that will receive the automated notification the report successfully runs or fails to run.
-
To
-
Subject
Use commas to separate addresses.
Send Success Notification
Select the Send success notification box to send an automated email notification when the report is successfully run.
Enter a Success Message in the text box. This message will display on the automated email notification.
Send Failure Notification
Select the Send failure notification box to send an automated email notification when the report does not successfully run.
Enter a Failure Message in the text box. This message will display on the automated email notification.
You may check one or both of the optional boxes to include additional information in the notification.
-
Include report job information
-
Include stack trace
Save
When all tabs are complete, select Save.
Complete the modal window:

Enter a Scheduled Job Name. This field is required.
Enter a Scheduled Job Description in the text box. This field is optional.
Scheduled Jobs

You will be returned to the Schedule Report page. The reports that you have scheduled are displayed.
The information includes:
-
Job ID
-
Job Name
-
Owner
-
State
-
Last Run - The date and time the scheduled report previously ran.
-
Next Run - The date and time of the next scheduled report run.
Enabled
By default the Enabled box is checked, you may clear it to disable the report without losing your saved schedule settings.
The State will be changed to Paused.
The Next Run will be set to Disabled.
Edit
Click the Edit  icon to make changes to a scheduled Job Name.
You will have access to the Schedule, Output Options, and Notifications tabs to make changes.
Delete
Click the Delete icon to remove the scheduled Job Name.
The following confirmation message displays:

Click Yes to proceed with deleting your scheduled job.
Click No to end the deletion process and keep your scheduled job intact.
Run Now
Select the Run Now option to run a scheduled job immediately.
The New Schedule window opens to the Output Options tab.

Make changes as needed.
You may also make Notifications.
Click Submit.
The Save window opens.
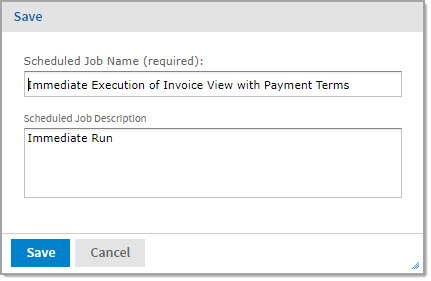
Enter a Scheduled Job Name, required, and optionally, add a Scheduled Job Description.
Click Save.
Your Run Now report will display in the Scheduled Jobs listing.
Refresh List
Select the Refresh List to update the Scheduled Jobs listing.