Credit Memo - Header Information
Select Create Credit Memo from the Invoice drop-down menu.
The create Credit Memo wizard opens to the Header Information step.

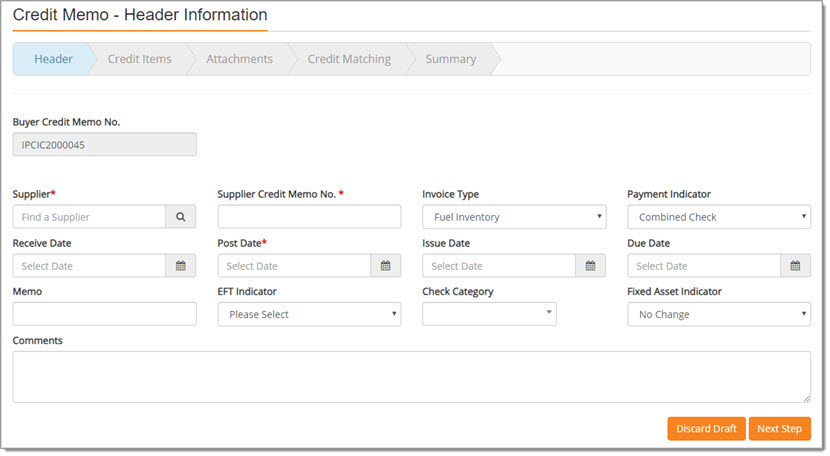
Complete this page as follows:
-
Buyer Credit Memo No. - This field is pre-populated with a system-generated number and may not be edited.
-
Supplier* - This is a required field. Complete this field in one of two ways:
-
This field utilizes type-ahead functionality; as you begin entering the supplier name, the system will retrieve matching results.
The application will display the supplier's address just below their name to help ensure you are selecting the correct supplier.

If the supplier is found using type-ahead, simply, click the supplier name to select it.
The selected name will populate the Supplier field.
Or... -
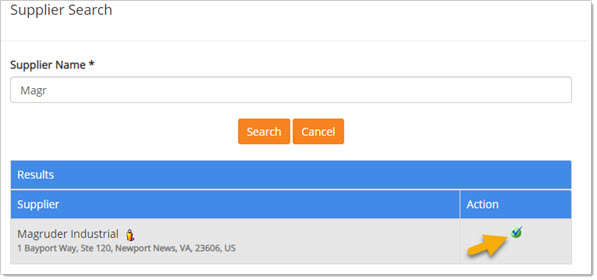
Use the Search
 icon to open the Supplier Search modal window.
Enter a full or partial Supplier Name and click Search.
The system will retrieve matching results.

The supplier listing will include the supplier name and address to help you in selecting the correct supplier.
Click the green check from the Action column to select the supplier for the Credit Memo.
The selected name will populate the Supplier field.
-
-
Supplier Credit Memo No.* - This is a required field. Enter in the Credit Memo Number provided by the supplier.
This field accepts up to 20 alpha numeric characters. -
Invoice Type - Use the drop-down menu to designate the type of invoice.
Values will vary per buying organization. -
Payment Indicator - Use the drop-down menu to choose how the Invoice will be paid.
The options will vary by organization. -
Receive Date - This is a required field.
Use the calendar icon to select the date that the Credit Memo was received. Receive Date must be on or after the Credit Memo Issue Date. -
Post Date - This is a required field. It defaults to today's date.
To change the date, use the calendar icon to select the date that the Credit Memo was/will be recorded as a transaction.
 -
Issue Date - This is a required field.
Use the calendar icon to select
the date that the Credit Memo was issued by the supplier.
 -
Due Date - This is a required field.
Use the calendar icon to select
the date that the Credit Memo is due as indicated by the supplier.
 -
Memo - Enter in supplemental information as it relates to the Credit Memo.
This field accepts up to 25 alpha numeric characters. -
EFT Indicator - This is a required field. Use the drop-down menu to designate the Electronic Funds Transfer indicator.
Options include: Yes or No. -
Check Category - This feature is optional and may or may not be used by your buying organization.
This field has type-ahead functionality. As you begin entering a check category, WebProcure will search your organization’s external financial data system, such as SAM II, to retrieve a listing of possible matches for selection.
To remove an assigned Check Category, choose the None () option.
Please see your internal WebProcure Administrator for more information regarding this field. -
Fixed Asset Indicator - Use the drop-down menu to select the appropriate indicator.
Values include: No Change (default), Create One Shell, and Create Multiple Shells. -
Comments - Use the Comments text box to enter in additional information about the Invoice.
This field accepts up to 2000 alpha numeric characters.
When header information is complete, click Next Step to proceed to Credit Items.
Click Discard Draft if you wish to exit the Credit Memo creation process without continuing.
A confirmation message will display:

Click Yes to proceed with discarding the changes. You will return to the Invoice/Credit/Payment Voucher List page.
Click No to close message and return to creating the Credit Memo.