Invoice Items
The second step in the invoice creation process is to Find PO Items.
After selecting Next from the Header page, the PO/Line Data page opens.

The following details are pulled in from the Invoice - Header Information page and may not be edited during this step.
-
Buyer Invoice No.
-
Supplier
-
Supplier Invoice #
Click the Vendor Profile  icon to view detailed information about the supplier.
View sample image.
Invoice Total
Located in the upper right corner is the Invoice Total. This is a floating window and as you scroll down through the invoice, it will scroll with you.
This calculates automatically as Invoiced Amounts and Miscellaneous Charges are added to the Invoice.

Find PO Items
Select the Find PO Items button to search for and select the purchase order that the invoice is associated with.
The PO Lookup modal window opens:

At the top of the window is the name of the supplier that was selected during the first step in the invoice creation process.
This information is not editable from this window.
By default, all purchase orders for the supplier are listed.
NOTE: Please know the listing of purchase orders will also include those in which a previous associated invoice was deleted.
Also, the system allows you to create another invoice on a purchase order that already has an invoice marked as Final Invoice yet not all items on the purchase order had been invoiced.
To refine the listing, use the Order # search field and/or the Organization drop-down menu.
-
Order # - Enter in a full or partial Order #.
-
Organization - Use the drop-down menu to choose the Organization name that the purchase order originated from.
Click Search to display only those purchase orders that match your entered Order # and/or Organization.
Cancel closes the PO Lookup window without saving changes.
If PO Not Found for Supplier
In the case where an Order # is not found for the supplier that was selected during the Header Information step, but it does exist for another supplier with a similar name, the system will:
-
Display a message advising you that the Order # was found but belonging to another supplier. See example image below:

-
-
Click Yes to change the supplier on both the Header Information and on the Invoice Items steps to reflect the supplier that is suggested in the message.
-
Click No to close the message and search for another Order # or return to the Header Information to select another supplier.
-
Add PO Items
Click the right facing arrow  to expand the purchase order and view details, including Line Numbers,
Part Descriptions, and Supplier Part Numbers.
to expand the purchase order and view details, including Line Numbers,
Part Descriptions, and Supplier Part Numbers.

Select the individual Line Numbers that are being invoiced or select the uppermost check box to select all Line Numbers on the purchase order.
Click the downward facing arrow  to collapse the purchase order details.
Repeat the above selection steps for each purchase order and Line Numbers that are to be added to the invoice.
When selection is complete, click Add PO Items.
You will return to the Invoice Items step and the selected Line Numbers will be displayed along with the PO #, Line Details, Description, Billing Status, Account Distribution etc.

NOTE: For those customers that utilize Account Code Distributions
, in all instances where Account Codes are displayed, you may select the information  icon to view the code descriptions.
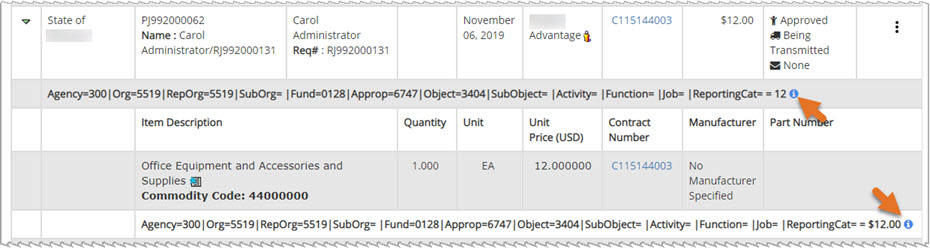

PO Details
The PO # that the item or items were pulled in from is shown above the first line item from that purchase order.

Invoice All
If all of the purchase order line numbers and quantities are to be invoiced, you may select the Invoice All button.
Select Invoice All to auto-populate the Invoiced Quantity and Invoiced Amount fields with the same values that appear on the Purchase Order.

Billing Status
The default value for Billing Status is OK. Use the drop-down menu to select an alternate status. Options include:
-
OK
-
Overbilled
-
Under billed
Confirm or change the Billing Status on each of the line items.
Fixed Asset Code
If your organization utilizes Fixed Asset Code functionality, the Fixed Asset Code field will be visible.

This field uses type-ahead functionality.
As you begin entering text, the system will retrieve matching results.
Simply click to select the appropriate Fixed Asset Code.
You may also use the Search  icon to search for and select the appropriate Fixed Asset Code.
Comments
-
Comments - If necessary, add supporting information into the Comments field. This field accepts up to 2000 alpha numeric characters.
Remove Line Item
To remove a purchase order line item, click the Delete  icon, located to the right of
the item.
icon, located to the right of
the item.
A confirmation message will display:

Click OK to proceed with removing the line item.
Cancel closes this message and leaves the line item intact.
Invoice Partial
If the invoice you are entering is not for all purchase order items, you may manually enter in the Invoiced Quantity, Invoiced Unit Price, and Invoiced Amount for each of the line items.

Billing Status
The default value for Billing Status is OK. Use the drop-down menu to select an alternate status.
Options include:
-
OK
-
Overbilled
-
Underbilled
Confirm or change the Billing Status on each of the line items.
Comments
-
Comments - If necessary, add supporting information into the Comments field.
This field accepts up to 2000 alpha numeric characters.
Remove Line Item
To remove a purchase order line item, click the Delete icon, located to the right of
the item.
A confirmation message will display:
Click OK to proceed with removing the line item.
Cancel closes this message and leaves the line item intact.
Final Invoice
If this invoice is complete or if it is the last invoice in a series of partial invoices, click the Final Invoice toggle to change the value from No to Yes.


Click a second time to revert the Final Invoice setting.
Accounting Data
Accounting data allocated at the item level displays for each item on the invoice, in a read-only format.

Values entered in the Invoiced Quantity, Invoiced Unit Price, and Invoiced Amount fields automatically calculate the total Account Distribution Amount.
Saved accounting data travels with the invoice and is accessible from the Invoice Summary, where both Header Level Cost Distribution and line item Account Distribution are visible.
NOTE: Accounting data is additionally displayed on invoices created by suppliers through the vendor portal or the eInvoice API. Accounting data is only visible on the buyer side, not on the vendor's.
Learn more about performing cost allocation at the item level.
![]()
For those customers that utilize Account Segment Code functionality, those account codes may not necessarily be memorized or universally understood. Look for the information icon ![]() located next to the Account Segment Code on the following pages:
located next to the Account Segment Code on the following pages:
- Payment Voucher - View, Create, Edit
- Track Requests
- Track Orders
- Purchase Order History
- Approval Inbox
- Invoice Summary
- Invoice Items
- Request modal in Document Cross Reference View
- PO modal in Document Cross Reference View
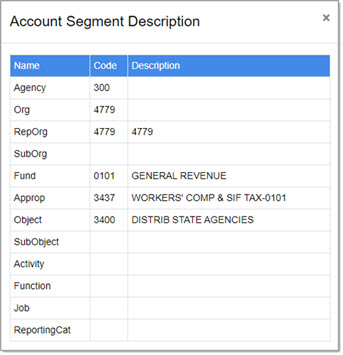
Click the icon to ![]() to view a modal window with the account code details. See example image below:
to view a modal window with the account code details. See example image below:
![]()
Freight/Miscellaneous Charges
If enabled by your organization, and if necessary, enter in the total Freight or Miscellaneous Charges from the invoice into this field.

Enter in applicable Comments as needed.
The Invoice Total will update automatically if any Freight/Miscellaneous Charges are entered.
Previous
To return to the previous step in the invoice creation process, click Previous.
Next
When all purchase order items have been added to the invoice and all data entry fields completed as needed, click Next to proceed to the Invoice Attachments step.
Discard Draft
Click Discard Draft if you wish to exit the Invoice creation process without continuing.
A confirmation message will display:

Click Yes to proceed with discarding the changes. You will return to the Invoice/Credit/Payment Voucher List page.
Click No to close message and return to creating the Invoice.