Invoice Import
The Invoice Import process provides users with a standardized template to complete and upload into the application, allowing them to import invoices in bulk. It is controlled by the Bulk Invoice Import switch available on the Invoice Management section of the Edit General Org Info page. Once enabled, the Invoice Import option is visible on the Invoice drop-down menu.
Select Invoice Import from the Invoice drop-down menu.

The Invoice Import page opens.

Download Invoice Template
Select Download Invoice Template to access the spreadsheet in a pre-defined template.
The download spreadsheet includes the following tabs:
-
Instructions - Provides information related to columns displayed on the Invoices tab, and their requirements.
-
Invoices – Allows user to input and modify invoice data within column rows.
-
Master Data - This is a read-only informational tab that shows the current system values for:
-
Check Category
-
Fix Asset
-
Billing Status
-
IMPORTANT: Be sure to select the Enable Editing button to save and make your changes.

Instructions
The Instructions tab provides information related to columns displayed on the Invoices tab, and their requirements.

Invoices
The Invoices tab allows user to input and modify invoice data within column rows.

This tab is divided into two sections: PO ITEM DETAIL and INVOICE DETAIL.
Fields for PO ITEM DETAIL include:
-
PONUM
-
POLINE
-
DESCRIPTION
-
QTY/AMOUNT
-
UNIT PRICE
Fields for INVOICE DETAIL include:
-
INVOICENUM
-
RECEIVEDATE
-
POSTDATE
-
ISSUEDATE
-
DUEDATE
-
FINAL INVOICE (Yes/No)
-
EFT (Yes/No)
-
COMMENT
Refer to the instructions, samples, and notes on the Instructions tab when entering data on this tab.
NOTE: Date fields may be either required or optional based on configurations saved on the Manage Invoice Fields page.
Blank column values are permitted for optional fields.
Master Data
The last tab is for MasterData.
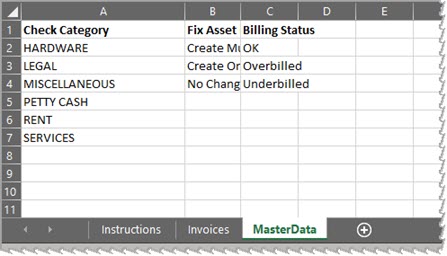
This tab contains read-only information identifying the acceptable values for each of the following columns:
-
Check Category
-
Fix Asset
-
Billing Status
Import Invoices with Errors
The Import Invoices with Errors check box determines how invoices that do not pass validation will be handled during the import process.
Import Invoices with Errors - Box is Checked
If the Import Invoices with Errors box is checked, all invoices will be imported, even if they contain errors.
Invoices with errors will display on the Invoice/Credit/Payment Voucher List page with a status of Rejected.
Import Invoices with Errors - Box is NOT Checked
If the Import Invoices with Errors box is not checked, invoices containing errors will not be imported, however, those invoices will be displayed with the applicable rejection error on the Error Report.
If the Import Invoices with Errors box is not checked, additional validations will process to apply the following workflow rules:
-
Vendor Status Approval
-
PO Total Tolerance Approval
-
PO Unit Price Tolerance Approval
-
PO Line Item Quantity Rule
Invoices that error out based on these validations, will not get imported or posted, and instead they will reject with the applicable error on the Error Report . Invoices rejected due to this type of validation, will not be visible in the user interface however, they will stay in a deleted status and captured in the back end invoice audit history.
Additional validation checks include, but are not limited to the following:
- Missing Unit Price
-
Unit Price containing Special Characters or Letters
-
Missing Quantity
-
Quantity containing Special Characters or Letters
-
Quantity of zero (0) - This matches the user interface behavior when creating an invoice.
Upload Invoices
Once you have completed the invoice spreadsheet, save to a local or network location.
Check or leave blank, the Import Invoices with Errors box.
Click the Browse... or Select File button on the Invoice Import page.
Navigate to the saved location of your completed template.

Select the file and click Open.
Click Upload.
The system will perform an initial verification / data validation.
At this point in the process, invoices are not yet added.
2-Way, 3-Way Permission Check
For the user that is performing the import, the system will automatically perform a check to determine if the user has one of the permissions relating to invoice matching. If the user performing the import does not have either privilege, the following advisory message displays:
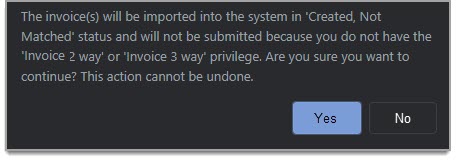
The message states: 'The invoice(s) will be imported into the system in 'Created/Not Matched' status and will not be submitted because you do not have the Invoice 2 way or Invoice 3 way privilege. Are you sure you want to continue? This action cannot be undone.'
Click Yes to proceed with the import process.
Click No to cancel the import process.
Invoice Import Report
The Invoice Import Report page displays a summary of Importable and/or Corrupted invoices.
A paginated list of importable invoices displays at the bottom of the screen.
Select the arrow to the left of the Invoice Number to expand and view invoice details.

Select from the following options:
-
Re-Upload File to return to the Invoice Import page and import a new or corrected spreadsheet.
-
View Full Error Report to open the error report in a modal window where it may be downloaded for review; it may also be shared with others.
NOTE: If the Import Invoices with Errors box is checked, errors will not be displayed. -
Close to exit the process without saving.
-
Upload Invoice to proceed with the import process.
NOTE: Once in progress, upload cannot be stopped.
View Full Error Report
Upon completion of the Invoice Import validation process, the Error Report may be downloaded and sent to the appropriate parties to resolve the listed errors and resubmit the corrected file back to the user performing the import.
Select the View Full Error Report button to open a modal window containing the Error Report.

Select Download Error Report to download a text file containing the errors.
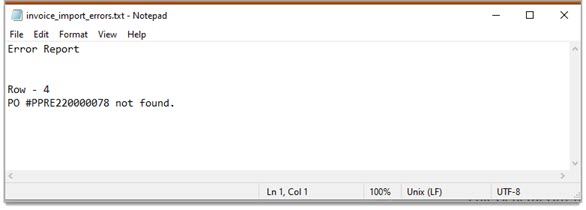
This file may be saved, printed, or shared with others for resolution, as needed.
Upload Success
The Uploading Invoices pop-up window informs user of invoice status and validation of import success.
Depending on your Import Invoices with Errors selection at the start of the import process, the system will upload only those invoices deemed importable or it will upload all invoices including even those deemed as corrupted.
The following image represents an uploaded file that passed validation.

-
Look for the count of invoices that have been uploaded successfully.
From the Uploading Invoices window, select the Import More Invoices button to repeat the process or Go to Invoice List to view uploaded entries. For each successful import, a message stating Invoice Imported is captured in the document’s History Log.

Key Points
-
The Import Invoices with Errors check box determines how invoices that do not pass validation will be handled during the import process.
-
The system will perform a user validation prior to the importing of invoices to determine if the user has 2-Way or 3-Way matching privileges.
-
An advisory message will display stating that the invoice(s) will be imported as Created / Not Matched but it will not be submitted as the user does not have the Invoice 2-Way or Invoice 3-Way privilege.
If they select Yes, the import process will proceed.
If they select No, the message closes and the import process will end.
-
-
The system will automatically match items on the invoice to those on a receipt or receipts.
-
If a match is not present, the system will accept the import, but set the Status to Created /Not Matched.
-
If the user is assigned the Invoice 2 Way Match permission, the status will be set to Approved.
-
-
Sample process flows:
-
Vendor Status Approval Rule enabled set to Auto Reject for Declined vendors.
-
The Import Invoices with Errors check box is not checked.
-
Import invoice for vendor that is in a Declined status.
-
RESULT: Invoice will not be imported. Error Report available for download.
-
-
-
-
Vendor Status Approval Rule enabled set to Auto Reject for Declined vendors.
-
The Import Invoices with Errors check box is checked.
-
Import invoice for vendor that is in a Declined status.
-
RESULT: Invoice is successfully uploaded.
-
-
-
-
PO Total Tolerance Approval enabled and set to Auto Reject.
-
The Import Invoices with Errors check box is not checked.
-
Import invoice where Invoice Amount exceeds PO Amount.
-
RESULT: Invoice is will not be imported. Error Report available for download.
-
-
-
-
PO Total Tolerance Approval enabled and set to Auto Reject.
-
The Import Invoices with Errors check box is checked.
-
Import invoice where Invoice Amount exceeds PO Amount.
-
RESULT: Invoice is successfully uploaded.
-
-
-
-
PO Line Item Quantity Rule enabled and set to Auto Reject.
-
The Import Invoices with Errors check box is not checked.
-
Import invoice where Invoice Quantity exceeds PO Quantity.
-
RESULT: Invoice is will not be imported. Error Report available for download.
-
-
-
-
PO Line Item Quantity Rule enabled and set to Auto Reject.
-
The Import Invoices with Errors check box is checked.
-
Import invoice where Invoice Quantity exceeds PO Quantity.
-
RESULT: Invoice is successfully uploaded.
-
-
-
-
PO Unit Price Tolerance Approval enabled and set to Auto Reject.
-
The Import Invoices with Errors check box is not checked.
-
Import invoice where PO Unit Price exceeds allowed tolerance.
-
RESULT: Invoice is will not be imported. Error Report available for download.
-
-
-
-
PO Unit Price Tolerance Approval enabled and set to Auto Reject.
-
The Import Invoices with Errors check box is checked.
-
Import invoice where PO Unit Price exceeds allowed tolerance.
-
RESULT: Invoice is successfully uploaded.
-
-
-
-