Enter Suppliers' Paper Responses
NOTE: Be aware that buying organizations may choose whether or not to allow vendors in a Pending status to be invited to a solicitation. If this configuration setting has been enabled by your organization, you will be able to enter paper responses on behalf of Pending status vendors. However, vendors with a status of Pending will not be available for an award of a solicitation. Your organization’s WebProcure Company Administrator will need to first place the vendor in an Approved status.
In order to include paper responses received from suppliers outside the system, select the Paper Response radio button.

Click Continue.
This opens the Add Paper Response page, allowing you to upload paper responses received outside the system.

NOTE: If a paper response has already been added, instead of seeing the Add Paper Response page, the Added Responses page will display.
Enter a full or partial name of the supplier that submitted the paper response.
An asterisk (*) may be used as a wildcard.
Click Search.
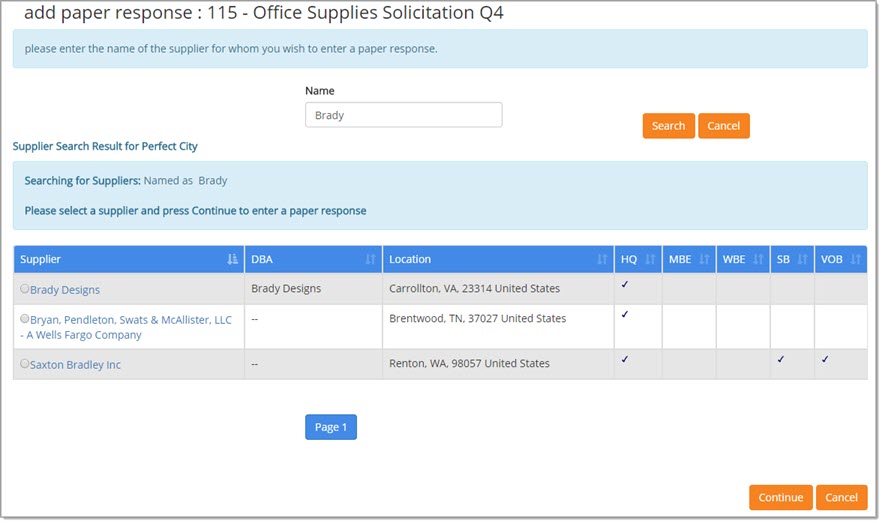
NOTE: Be aware that buying organizations may choose to show or hide vendor demographic information including diversity designations.
Select the supplier that you wish to submit a paper response on behalf of.
To select the supplier, click the radio button on the far left of the page.
Click Continue.
Possible Scenario
Invalid Vendor for Bid
If the vendor was not invited to participate in the bid, the following message will display:

Be advised that you will need to search and select a vendor that was invited to participate in the solicitation in order to enter a paper bid response on their behalf.
Choose the Home icon or make an alternate menu selection to close this message.
Previous Responses
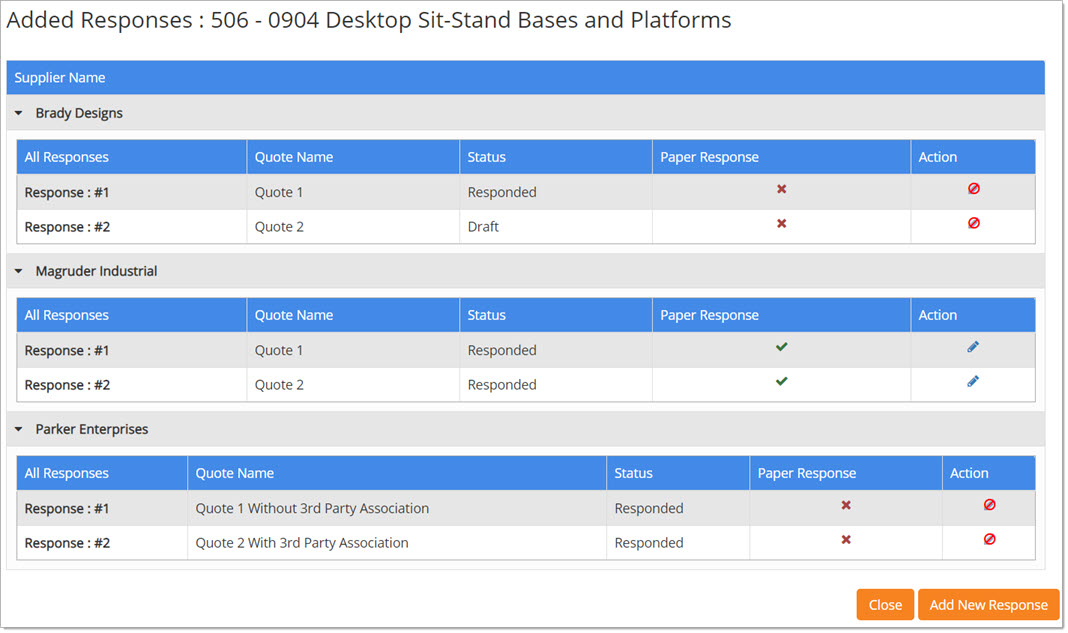
If a response has been submitted by the vendor or, if a paper response has already been entered, the Added Responses page will include the Status and Quote Name.
See the example image below:
NOTE: Multiple quotes is a feature that may or may not be enabled for your organization.
If this feature is disabled, only one vendor or buyer-on-behalf of vendor response will be allowed.
Using the above image as an example, there are four total responses from three vendors. Only one response is a Paper Response as indicated by the green check mark.
Located to the left of the vendor name are the expand / collapse arrows.
Click the right-facing ![]() arrow to expand and view the response name and status.
arrow to expand and view the response name and status.
Click the downward-facing ![]() arrow to collapse the response name and status.
arrow to collapse the response name and status.
Icon meanings.
|
Icon |
Meaning |
|
|
Not Applicable |
|
|
Paper Response |
|
|
Edit |
|
|
Edit Not Allowed |
Add New Response
Click Add New Response.
The solicitation opens to the Overview page.
Depending on whether or not Requirements and/or Questionnaires and/or Collaboration Center are enabled by your organization, those tabs will be visible along with the Overview, Respond, and Attach Documents.
![]()
Requirements
Select the Requirements tab to address each question as needed.
-
Instructions - Used to provide informative, read-only information.
-
Text Response Fields - Enter the supplier's text response, if any, to the question/field.
-
Rich Text Response Fields - This field allows a text response that can also include hyper-links and additional formatting.
Enter the supplier's response, if any. -
Attachment Response Fields - Solicitation creator is asking for an uploaded document as part of the supplier's response.
-
Date Response Fields - Used to select a date from the calendar as the supplier's response.
When responses are complete, click Save.
Close discards any data entry or selections without saving and the application returns to the Add Paper Response page.
Questionnaire
The question types will vary but may include any of the following:
-
Text - Intended for suppliers to provide a text response to the question. Example: "List all landscaping maintenance services your organization is able to provide. "
-
Attachment - To upload the supplier's attachment response, click Select a File... to navigate to the location of the document to be uploaded.
Once found and selected, click Open. The section will refresh to display the attachment as an active hyper link.
To view a document, select the document name. To remove a document, select the Remove icon.
icon. -
Drop-down - Intended for suppliers to choose an answer from a list of available options.
Example: "Choose the range that represents the number of employees in your organization?"
Answer options could be: 1-25, 26-50, 51-100, more than 100. -
Yes/No - Intended for suppliers to select a radio button in response to a yes or no question.
Example: "Does your organization have a valid contractor's license in the state of _____?"
Answer each question on behalf of the supplier. When finished, click Save.
Close discards any data entry or selections without saving and the application returns to the Add Paper Response page.
Attach Documents
To associate a supplier document to the solicitation via the paper response method, choose the Attach Documents tab and then select Add Attachment.
The Upload Document window opens. Click the Browse or Choose File (depending upon your browser) button to navigate to the local or network location of the document that is to be attached. From the Choose File to Upload window, select the document and click Open. Repeat these steps for each document that needs to be attached.
NOTE: Maximum individual file size is 80MB. File size may impact the uploading and downloading speed. Slower network connections may result in browser time-out issues which may lead to failed upload/download attempts. Please consider this dependency when attaching very large documents.
To add the documents to the organization's library for future availability, check the box in the Add to Library column to the right of the document.
Click Upload to attach the documents to the solicitation.
Cancel will discard the selected documents and close the Upload Document window without adding any attachments.
The file attachment size limit is 2GB.
Up to 5 files may be uploaded at a time. To add more than 5, simply click Save, return to the Document Selection window and click the Upload New Documents button again.
Repeat the steps for browsing and selecting your documents.
After selecting Upload, the application will return to the larger Document Selection window and display the selected documents.
The documents will display in ascending order by Document Name.
Each Document Name is an active hyper link; click to open and view the document.
To remove a document, click the Delete option from the Actions column.
To download a document, click the Download option from the Actions column.
Click Done.
Confidential Documents
If your buying organization allows vendors to mark uploaded documents as Confidential, the Confidential check box will be visible on the Upload Document window.
Once the attachments have been added, you may designate which of the attachments are to be considered Confidential.
Click Upload to attach the documents to the solicitation.
Cancel will discard the selected documents and close the Upload Document window without adding any attachments.
If one or more documents was designated as Confidential, a confirmation message displays.
The message reads: 'You have chosen to designate one or more of your attachments as confidential. Any confidential attachments will not be published by default upon Solicitation award. Buyer, at their discretion, may choose to override this setting and publish any documents included in the Solicitation response. Please confirm that these attachments are confidential by typing the word YES in the confirmation box below and clicking the Confirm button. Clicking the Cancel button will allow you to change your attachment settings before upload.'
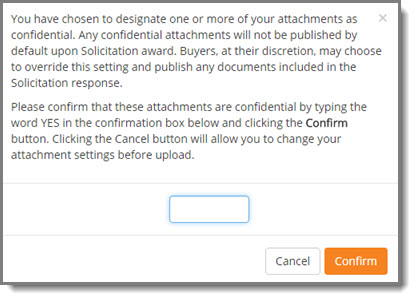
To proceed with labeling the uploaded attachments as Confidential on behalf of the vendor, enter YES into the text field.
Click Confirm.
When all documents to be attached to the line item appear listed on the Upload Document page, click Upload.
Confidential documents will display with this ![]() icon to the right of the document name.
icon to the right of the document name.
Delete Attachment
To remove an attachment that was added by you on behalf of the supplier, click the Delete option from the Actions column.
A confirmation message will display:

Click OK to proceed with deletion of the document.
Cancel ends the deletion process; document remains intact.
Collaborate
The Collaboration Center facilitates a two-way line of communication between the vendor community and your organization.
This interactive module allows suppliers to submit questions and for our organization to respond in kind.
If this functionality is enabled by your organization, the Collaborate tab will be visible.
The functionality appears and behaves exactly the same way as it does when the supplier logs in and submits their own questions in the system.
You will be able to enter collaboration data on behalf of a supplier even after the collaboration end date has passed.
In instances where the solicitation has ended and you utilize the Paper Response functionality to enter questions and answers into the Collaboration Center, automated notifications will not be sent to the participating supplier(s).
Respond
Solicitation WITH Line Items
Enter the bid information as provided by the vendor.
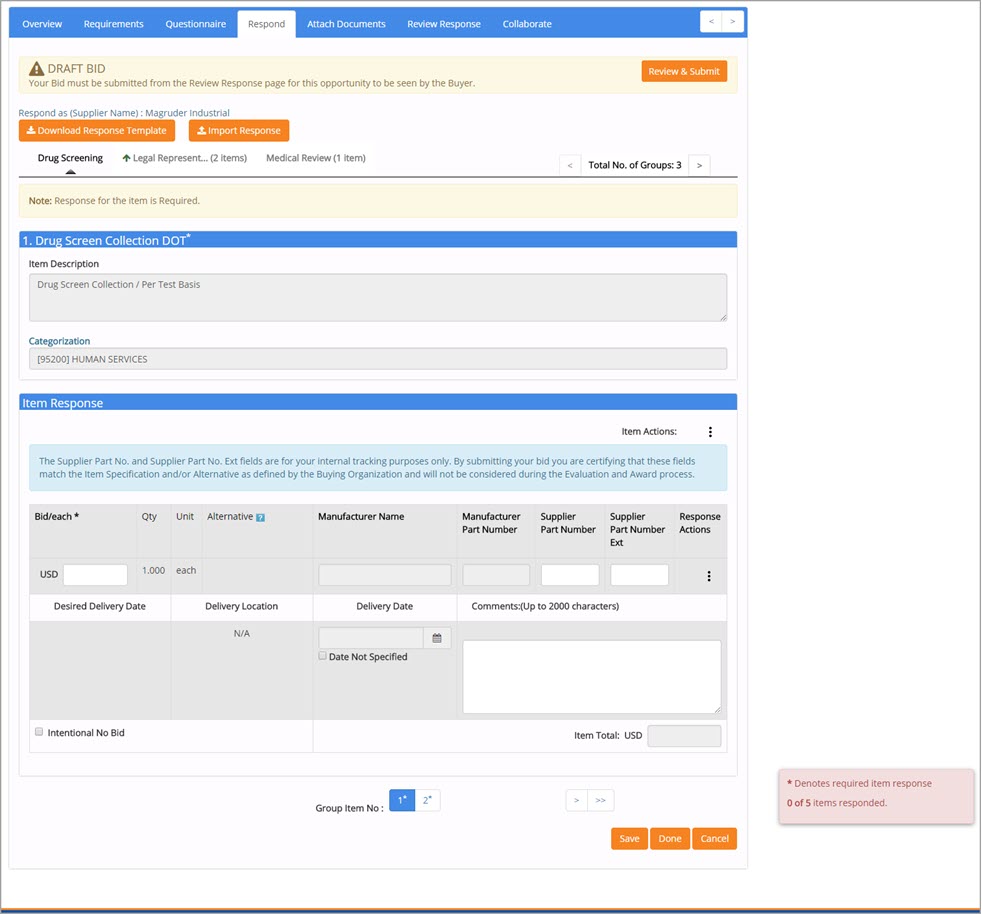
Export/Import Item Responses
You may choose to download the solicitation line items, provide the vendor's bid response directly into the template, and then upload the completed file into the WebProcure application.
If the solicitation contains line items and you prefer to complete the spreadsheet on behalf of the vendor with their pricing response information, complete the Requirements and Questionnaire tabs as needed and select the Respond tab.
Download Response Template
The first step in the export / import process is to select the Download Response Template button located at the top of the Respond page.

A Microsoft™ Excel spreadsheet will download.
NOTE: Depending on your application or computer security settings, you may be required to Enable Editing and save to a local drive location to perform the edits.

IMPORTANT: Do not change the file / sheet name / names.
Key Points Regarding Template
-
Do not change the file/sheet name/names.
-
Do not refresh the page while the upload is in progress.
-
Protected buyer fields may not be edited.
-
Hover over a cell to view applicable instructions regarding data entry, if any.
The values in the following columns may not be edited.
|
Solicitation Number |
Title |
Item Name |
Item Description |
|
Categorization |
Substitute Allowed |
Multiple Alternates Allowed |
Mandatory Response |
|
Buyer Manufacturer Name |
Buyer Manufacturer Number |
Desired Delivery Date |
Delivery Location |
|
Specified Alternates |
Unit |
Qty |
Pricing Factor |
|
Pricing Type |
|
|
|
The steps to complete the Response worksheet in the template are as follows:
-
Bid / Unit - This cell accepts only numeric values. Enter the vendor's bid response for this line item per unit of measure.
-
Supplier Part Number - Enter the Supplier Part Number, if desired.
-
Supplier Part Number Ext - Enter the Supplier Part Number, if desired.
-
Delivery Date - Enter your delivery date in MM/DD/YYYY format. If delivery date cannot or should not be specified, leave this cell blank and choose the Yes option from the drop-down menu in the Date Not Specified column.
-
Date Not Specified - The default value is No. If a Delivery Date is not specified, be sure to choose the Yes option from the drop-down menu.
-
Comments (Up to 2000 characters) - To include comments with your line item bid response, enter up to 2000 alpha numeric characters in the Comments cell.
-
Intentional No Bid - The default value is No. If you wish to intentionally submit a No Bid for this line item, be sure to select the Yes option from the drop-down menu.
Save the file. Be sure to not rename any worksheets or the file name.
Continue reading for instructions on how to import your response.
Import Response

Browse to the local or network location of your completed and saved template.
Click to highlight and select the file.
Click Open.
The selected file name will appear in the text box located to the right of the Browse button.
When ready, click the Import Response button.
Validation
The following validations will be performed on your import:
-
File name must be same as downloaded file name.
-
Unit price should be numeric.
-
Delivery Date should not be before current date.
-
Comment cell cannot contain more than 2000 characters.
-
If Additional Item Response is marked as required, it cannot be left blank.
Successful Import
If the spreadsheet passes validation, the following success message displays.

Click OK to acknowledge and close the message.
You will land on the Review Response page.
Item Actions
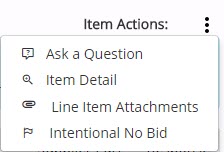
Located on the far right side of the Item Response section are several Item Actions.
|
Option |
Icon |
Resulting Action |
| Ask a Question |
|
Click this option to submit a question on behalf of the vendor. View Questions and Answers for more information. |
| Item Details |
|
Select Item Details o open Item Specification Detail window and view item specifics. |
| Line Item Attachments |
|
Select Line Item Attachments to view existing line item attachments or add new attachments. This topic is discussed in detail Supplier Documents. |
| Intentional No Bid |
|
Select the Intentional No Bid option to acknowledge that the supplier has viewed the item but does not wish to submit a bid for the item. See Intentional No Bid topic for more information. |
Group Level Adjustment
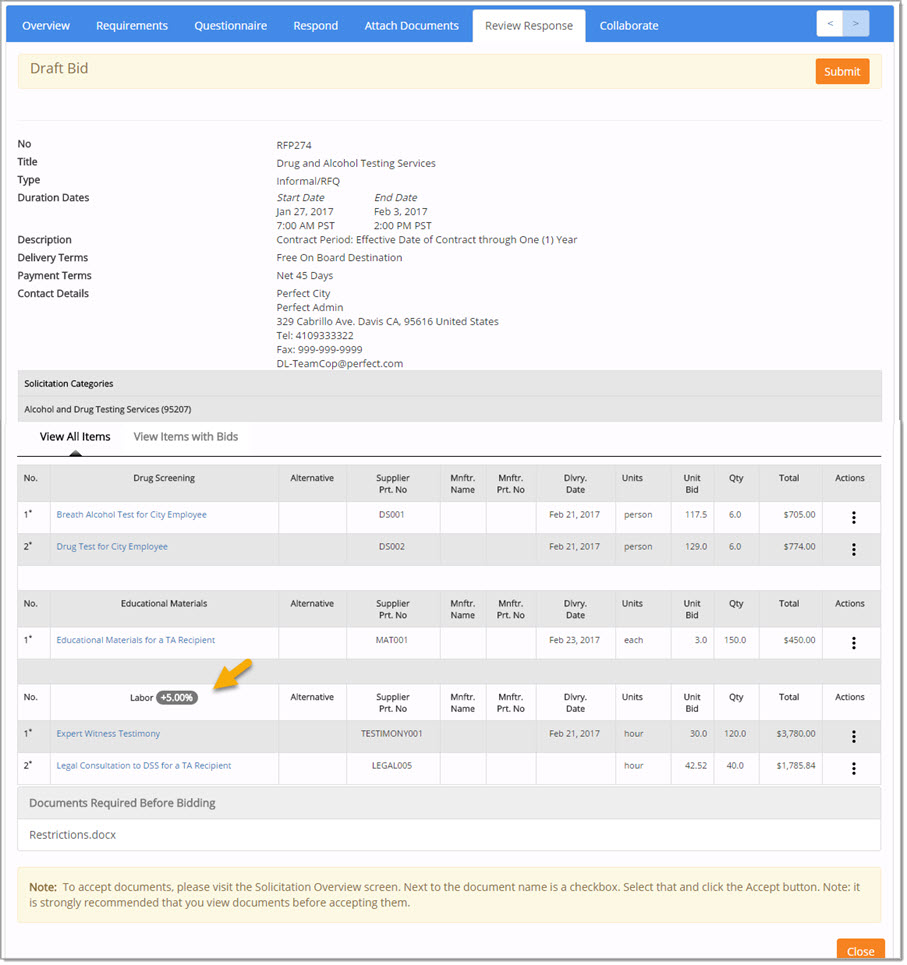
If Group Level Adjustment has been applied to a group of solicitation items, there will be a Markup indicator  located to the left of the Group name.

In the above sample image, the Labor group has had a Group Level Adjustment applied.
The Group Markup * field is where you will enter, on behalf of the vendor, a percentage markup that applies to all items in the group.
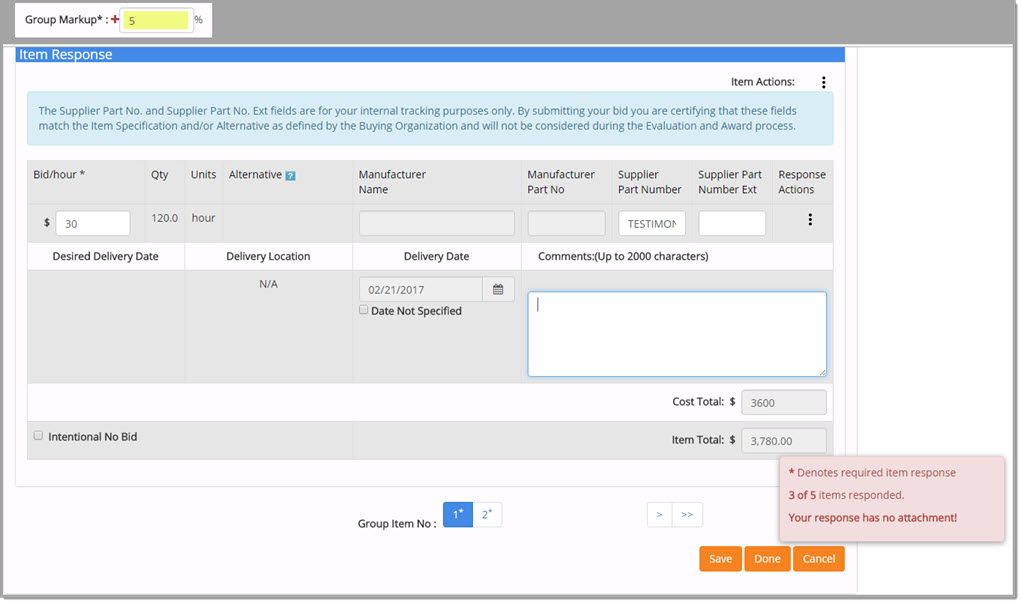
The system calculates Price * Quantity to arrive at Cost Total. In the above sample image, the item bid is $30 / hour for 120 hours therefore Cost Total is $3600.00.
The system then adds in the Group Markup percentage of 5% resulting in an Item Total of $3780.00.
The Review Response page will display the applied percentage markup.
The steps to complete the individual bid fields are described below.
Bid on Items
Complete page as follows:
-
Price/each - Enter the supplier's dollar amount per unit of the item.
-
Alternative - This field will only be enabled if the solicitation creator specified approved or requested options for brand, make, or model.
If this field is enabled as a free text field, the Manufacturer Name, and Manufacturer Part No. fields will be also be active. -
Supplier Part Number - Enter the supplier's part number for the item.
-
Supplier Part Number Extension - If applicable, enter the extension of the supplier's part number for the item.
NOTE: The Supplier Part Number and Supplier Part Number Extension fields are for the supplier's internal tracking purposes only. By completing these fields on behalf of the supplier, the supplier certifies that these fields match the Item Specification and/or Alternative as defined by the solicitation creator and will not be consider during the Evaluation and Award process.
-
Delivery Date - Use the calendar icon to select the supplier's specified delivery date for this item.
If a delivery date was not provided by the supplier, select the Date Not Specified box. -
Comments - Enter any additional information from the supplier's paper response in the Comments text box.
This field may be used to note special offers on items or detailed information about the product.
If the supplier chooses not to bid on an item, check the Intentional No Bid box or choose the Intentional No Bid link to acknowledge that no bid amount is being entered for the item.
Save after each item.
Click Next to advance to other items in the solicitation.
Click Done when finished to return to the Evaluate and Award page.
The manually entered paper response will be reflected in the Total Award Summary section.
Response Actions
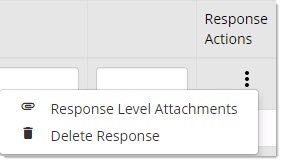
Located to the right of the Supplier Part Number and Supplier Part Number Ext, is a box containing Response Actions.
NOTE: This box will not be visible if the Intentional No Bid check box or icon was selected for the item.
|
Option |
Icon |
Resulting Action |
| Response Level Attachment |
|
In order to add or edit response level attachments, the bid must first be saved. Select Response Level Attachment to view existing supplier item attachments or add an unlimited number of new attachments. This topic is discussed in detail Supplier Documents. |
| Delete |
|
Select Delete to remove an entered response on the item. A confirmation message will display asking you to confirm deletion. Data entered in the response fields for the item will be cleared. |
Alternatives
The Alternatives column will be visible with a drop-down menu if the solicitation creator added items that allowed the supplier to choose from an approved listing of options for alternatives, such as a listing of preferred Brands, Makes, or Models. It may be used to specify approved or requested product options such as recycled versus n0n-recycled.
It may be used to allow the supplier to specify a particular district that their response applies to.

Use the drop-down menu to select one of the pre-determined alternative options.
Complete other fields as needed.
Propose Alternative
The Propose Alternative button is only visible if the solicitation creator has elected to allow suppliers to specify substitute alternates or provide proposals of their own to the items in the solicitation.
Select this button to refresh the page.
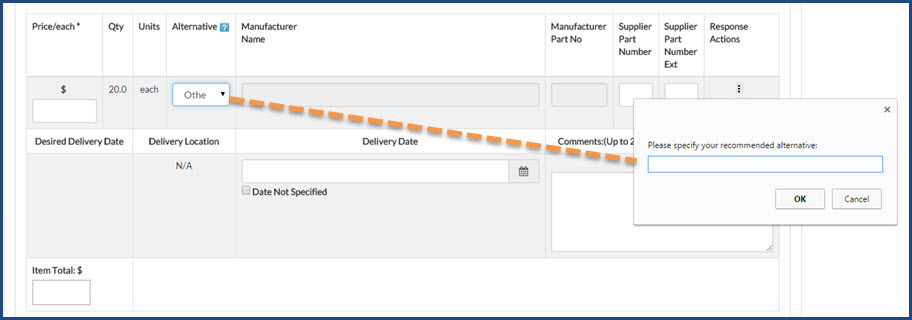
You may enter the alternate item information provided by the supplier and complete remaining fields as needed.
Repeat this step for each alternative that needs to be entered.
Solicitation WITHOUT Line Items
If the solicitation has no line items, then submitting a response on behalf of a supplier will mean uploading a supplier's submitted documents as the response.

Add Attachment
Click Add Attachment to open the Upload Documents window.
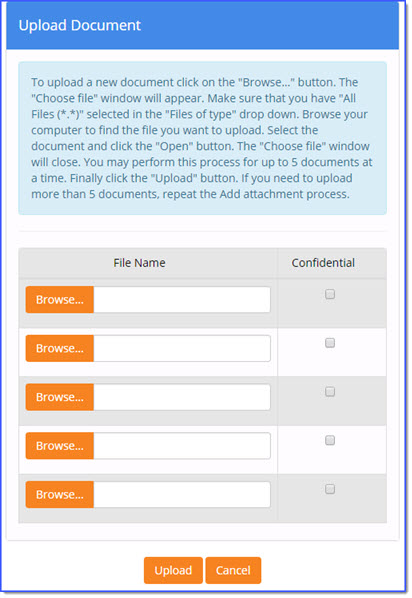
NOTE: Buying organizations can choose whether or not to allow participating vendors to mark their uploaded documents as Confidential. If the buying organization has this enabled, the Confidentiality column will be visible and you should follow the instructions below. If, however, the buying organization disallows marking documents as Confidential, the following advisory message will display: 
Click Browse or Choose File, depending on your browser, to navigate to the local or network location of the saved supplier's document.
Once the document is selected, click Open.
The application will return to the Attach Documents page displaying the added attachments.

Notice that the document has (Paper Quote) noted next to the document that was uploaded on behalf of the supplier.
NOTE: Formal solicitations will display (Paper Bid).
Repeat these steps for each supplier document to be added.
Confidential Documents
Once your attachments have been added, you may designate which of the attachments are to be considered Confidential.
Click Upload to attach the documents to the solicitation.
Cancel will discard the selected documents and close the Upload Document window without adding any attachments.
If one or more documents was designated as Confidential, a confirmation message displays.
The message reads: 'You have chosen to designate one or more of your attachments as confidential. Any confidential attachments will not be published by default upon Solicitation award. Buyer, at their discretion, may choose to override this setting and publish any documents included in the Solicitation response. Please confirm that these attachments are confidential by typing the word YES in the confirmation box below and clicking the Confirm button. Clicking the Cancel button will allow you to change your attachment settings before upload.'

To proceed with labeling the uploaded attachments as Confidential on behalf of the vendor, enter YES into the text field.
Click Confirm.
When all documents to be attached to the line item appear listed on the Upload Document page, click Upload.
Delete Attachment
To remove an attachment that was added by you on behalf of the supplier, click the Delete option from the Actions column.
A confirmation message will display:

Click OK to proceed with deletion of the document.
Cancel ends the deletion process; document remains intact.


