Contract Workflow
Contents
- Workflow For
- Approval Steps
- e-Sign Enabled
- Build Contract Approval Workflow
- Org Contract Approval Workflow
- Total Contract Value Approval Workflow
- Vendor Contract Signature
- User Contract Total Value Approval
- Delete Workflow
- Contract Type Approval
- Delete
Select the Contract Workflow option from the Workflow menu under Administration in order to assign an approver to the contract approval process.

The Contract Workflow page opens:

Workflow For
At the top of the page, you will see a Workflow For toggle switch for Contract and Contract Amendment.
The default Workflow For setting is Contract.
This switch determines which document you are configuring the workflow for.
Approval rules may be established for Contracts and a set of different rules for Contract Amendments.


Simply click the colored box in the Workflow For area to switch between the two.
This topic covers Contract Workflow.
Contract Amendment Workflow is covered in its own topic.
Approval Steps
By default the Approval Steps type is Serial. The alternate option is Parallel.
-
Serial - Approvals occur one after another. Each approval is completed in a designated order.
A contract will not be available to Approver B until Approver A approves it. -
Parallel - Approval occurs independently of other approvals.
The document is sent to multiple approvers at the same time.
The Approval Steps is a toggle switch, allowing you to change from Serial to Parallel and vice versa.

e-Sign Enabled
If an electronic signature is required as part of the workflow rule, the designated approver or one member of the approval group, will need to sign and approve from their approval inbox.
By default, this setting is set to No.
To enable the requirement of an electronic signature, click the e-Sign Enabled toggle switch to change the value to Yes.

Simply click the colored box in the e-Sign Enabled column to switch between the Yes and No.
NOTE: Contract edits must be made before signature and approval.
Visit the topic regarding approving and signing for more information.
Build Contract Approval Workflow
Enable Approval Rule
Click the Enabled check box to activate an Approval Rule.
Approval Steps
Determine if this workflow rule will be based on a serial or parallel configuration.
-
Serial - Approvals occur one after another. Each approval is completed in a designated order.
A contract will not be available to Approver B until Approver A approves it. -
Parallel - Approval occurs independently of other approvals.
The contract is sent to multiple approvers at the same time.
The Approval Steps is a toggle switch, allowing you to change from Serial to Parallel and vice versa.
If you change an existing approval workflow from one type to another, the system will display confirmation messages:


Click Continue to proceed with workflow step change.
Rule Order
Enter a numeric value for the approval rule in the Rule Order box.
The value entered determines in which order the rule will be processed.
For example, Rule Order 1 is processed before Rule Order 2 and Rule Order 3, etc.
Re-Approval Rules
Use the Re-Approval Rules setting to determine what happens if a contract is modified.
Depending on the rule type, the available Re-Approval Rules will vary.
-
Org Contract Approval - Re-Approval Rule
-
Always Re-Approve. If this workflow rule is enabled, any and all contract amendments will re-launch workflow.
-
-
Total Contract Value Approval - Re-Approval Rule
-
Re-Approval is Required if Contract Total Value Increases. If this workflow rule is enabled, and a contract amendment results in the Total Value of the contract being increased, then workflow will be re-launched.
-
Always Re-Approve. If this workflow rule is enabled, any and all contract amendments will re-launch workflow.
-
-
Vendor Contract Signature - Re-Approval Rule
-
N/A
-
-
User Contract Total Value Approval - Re-Approval Rule
-
Always Re-Approve - If this workflow rule is enabled, any and all contract amendments will re-launch workflow.
-
Re-Approval is Required if Contract Total Value Increases. If this workflow rule is enabled, and a contract amendment results in the Total Value of the contract being increased, then workflow will be re-launched.
-
-
Contract Type Approval - Re-Approval Rule
-
Always Re-Approve - If this workflow rule is enabled, any and all contract amendments will re-launch workflow.
-
No Re-Approval Required - If this workflow rule is enabled, no re-approval will be required, regardless of amendments made.
-
Required if Contract Total Value Increases - If this workflow rule is enabled, and a contract amendment results in the Total Value of the contract being increased, then workflow will be re-launched.
-
Org Contract Approval Workflow
Click the Edit Approvers button for the rule you wish to configure.
A Contract Org Approver modal window opens:

Start Contract Workflow
Click the Start Contract Workflow button to begin configuring your contract document workflow.
A modal window opens.

Use the Approver Type drop-down menu to select whether the approver will be an Individual Approver or Approval Group.
Begin entering the name of the individual or group into the Contract Approver field.
The system will automatically retrieve users or groups that match your entered text.
At least two or more characters will need to be entered for the system to retrieve results.
Use two asterisks ** to retrieve a complete listing.

Select the desired name or group.
Click Select.
The user or group will be added to the page in a new workflow box.

To remove the user click the X located in the upper right corner of the blue box.
Notice there are two arrows inside the box.
-
In the case of a Serial workflow,
-
-
The left-facing arrow may be selected to add another approver or approval group before this approver/approval group..
-
The right-facing arrow may be selected to add another approver or approval group after this approver/approval group..
-
-
In the case of a Parallel workflow, the two arrows will be located at the top and bottom of the box.
-
-
The top or up-facing arrow may be selected to add another approver or approval group before this approver/approval group.
-
The bottom or down-facing arrow may be selected to add another approver or approval group after this approver/approval group.
-
NOTE: For Parallel workflow rules, be advised that all approvers or approval groups shown, will receive the notification that a document is pending their approval at the same time and will be able to approve/reject in any order.
If an arrow is selected, the modal window opens again.
Repeat the previously mentioned steps to select an Individual Approver or Approval Group for as many approvers as need to be added.
Serial / Parallel
Serial

The above sample image represents a Serial workflow path.
In this example, once the contract is submitted to workflow, it will need to be approved by Julie Criswell before Herman Campbell receives it in his approval queue.
Once Herman Campbell approves it, Andrew Comenzo will be notified that the contract document is pending in his queue.
Parallel
The following image represents a Parallel workflow path.

In this example, once the contract is submitted to workflow, it may be approved by any of the listed approvers in any order.
All approvers must approve it before it will become active.
Save
Be sure to click Save to commit all changes.
Delete Workflow
Select Delete Workflow to remove the workflow setup for this organization.
The following confirmation message displays:

Click No to exit the message; existing workflow remains intact.
Click Yes to proceed with deleting all of the contract workflow setup for this organization.
Total Contract Value Approval Workflow
Click the Edit Approvers button for the Total Contract Value rule.
A Total Contract Value Approval Limit modal window opens:

NOTE: Approvers must be sorted in ascending order by approval limit.
Add Approver
Click Add to search and select an approver.
A modal window opens.
Use the Approver Type drop-down menu to select whether the approver will be an Individual Approver or Approval Group.
Begin entering the name of the individual or group into the Contract Approver field.
The system will automatically retrieve users or groups that match your entered text.
At least two or more characters will need to be entered for the system to retrieve results.
Use two asterisks ** to retrieve a complete listing.
Select the desired name or group.
Click Select.
The user or group will be added as a row to the Total Contract Value Approval Limit page.

The Total Contract Value Approval Limit page identifies the Sequence of the approver and the Approver.
Total Contract Value Limit
The Total Contract Value Limit field displays blank by default and needs to be completed by you.
Enter a numeric value in the Total Contract Value Limit.
The numeric value entered in the Total Contract Value Limit field serves as a trigger or threshold for that particular approver or approval group.
If a Contract that exceeds the entered amount is submitted, the approval workflow will be launched and the contract sent to the approver or approval group for approval or rejection.
A zero dollar amount may be added.
Repeat above steps to add another approver or approval group.
To create a chain workflow, multiple approvers or approval groups must be added.
See workflow chain topic below.
Ascending Order by Approval Limit
Approvers or approval groups must be sorted in ascending order by approval limit (threshold).
The system will display warning messages when the workflow is saved but is not sorted correctly.

If necessary, simply drag and drop the approvers or approval groups into the correct sequence.
Simply hover over an approver row until you see the hand  icon, click the row and then drag the row to the appropriate location.
The approval limits should be in ascending order.
Example of Implementing a Contract Workflow Chain
Let's use the following diagram as an example.

The Total Contract Total Value Limit fields would be entered as follows:

As a result, a contract totaling $5500 would result in the following approval path:

All three threshold amounts of $500, $1000 and $5000 were surpassed, therefore all three approvals will be required for this contract to be issued.
There are several prerequisites that need to be managed in order to fully implement the new Request Total Chain Workflow.
-
Contract Total Value Approval Rule must be enabled and configured, (parallel or serial).
-
Approvers/Approval Groups must have an appropriate approval limit assigned.
Change Approvers
To change an approver or an approval group, follow the steps below to delete the approver and then follow the steps to add a new approver or approval group.
Delete Approvers
If necessary, the approver may be removed by selecting the Delete icon located to the right of the approver or approval group name.
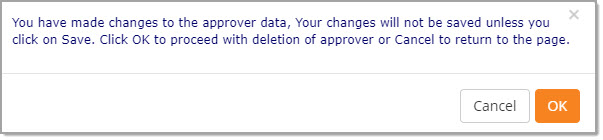
A confirmation message will display:

Click OK to proceed with deleting the approver or approval group.
Cancel ends the deletion process and the current designated approver remains intact.
Vendor Contract Signature
If you wish to have the contracted vendor electronically sign the contract, check the Enabled box for Vendor Contract Signature Approval Rule.
To disable this Approval Rule, simply clear the check box.
By default the e-Sign Enabled value displays Yes.
Choose the Rule Order.
Click Configure.
The Vendor Contract Signature modal window opens.
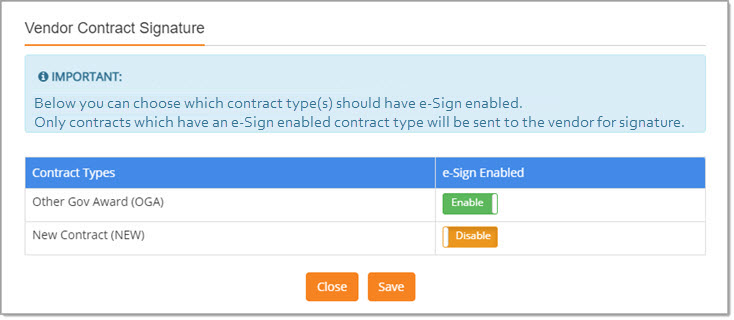
You may determine which Contract Types that you wish to enable/disable electronic signatures.
The listed Contract Types are configured in the Configure Documents > Manage Document Types section of the Administration Menu.
The listed Contract Types will only be those that have been enabled for your organization.
Use the e-Sign Enabled column to decide which Contract Type will require an electronic vendor signature.
Key Points:
-
The Vendor Contract Signature workflow rule must be enabled and one or more Contract Types configured for it, in order for the rule to function.
-
Simply enabling the workflow rule by itself is not enough because, by default, all Contract Types will be disabled for it.
-
-
If a new Contract Type is added after this workflow rule is enabled, by default, the e-Sign Enabled toggle will be set to Disable.
NOTE: Be advised that contracts will not be visible to Distributors in the Vendor Portal during the vendor signature phase of the workflow. Once the contract is signed and is Issued or becomes Active, then it will be visible to the Distributors.
Save
Be sure to click Save to commit all changes.
User Contract Total Value Approval
This workflow is used in conjunction with the Contract Workflow that is established on the user's profile.
![]()
Check the box located to the right of the User Contract Total Value Approval to enable this workflow rule.
Use the Serial / Parallel toggle to determine the type of workflow.
Use the e-Sign Enabled toggle to determine whether or not contracts launched into workflow will require the approvers or approval group to electronically sign/approve the contract.
Set the Rule Order.
Determine the Re-Approval rules.

-
User Contract Total Value Approval - Re-Approval Rule
-
Always Re-Approve - If this workflow rule is enabled, any and all contract amendments will re-launch workflow.
-
Re-Approval is Required if Contract Total Value Increases. If this workflow rule is enabled, and a contract amendment results in the Total Value of the contract being increased, then workflow will be re-launched.
-
Be sure to Save your changes.
Save
Be sure to click Save to commit all changes.
Delete Workflow
Select Delete Workflow to remove the workflow setup for this organization.
The following confirmation message displays:
Click No to exit the message; existing workflow remains intact.
Click Yes to proceed with deleting all of the contract workflow setup for this organization.
Contract Type Approval
This workflow may be configured for Contracts based on a particular Contract Type.
![]()
Check the box located to the right of the Contract Type Approval to enable this workflow rule.
Use the Serial / Parallel toggle to determine the type of workflow.
Use the e-Sign Enabled toggle to determine whether or not contracts launched into workflow will require the approvers or approval group to electronically sign/approve the contract.
NOTE: The e-Sign setting will need to be toggled to Yes on the Contract Type Approval workflow rule first, for the e-Sign Enabled column to be active at the approver level. Enabled e-Sign accommodates Contract Type workflows that contain a combination of approvers and signatory approvers, to differentiate those that need to approve from those that need to electronically sign.
Set the Rule Order.
Determine the Re-Approval rules.

-
Contract Type Approval - Re-Approval Rule
-
Always Re-Approve - If this workflow rule is enabled, any and all contract amendments will re-launch workflow.
-
No Re-approval Required - If this workflow rule is enabled, no re-approval will be required, regardless of amendments made.
-
Re-Approval is Required if Contract Total Value Increases. If this workflow rule is enabled, and a contract amendment results in the Total Value of the contract being increased, then workflow will be re-launched.
-
Click the Edit Approvers button for the Contract Type Approval rule.
A Contract Type Approver modal window opens:

NOTE: Approvers must be sorted in ascending order by approval limit. To make it easy, use the drag and drop method to place approvers in the correct order.
Select Contract Type
Use the drop-down menu to select the Contract Type that you wish to configure workflow for.
The values listed in the drop-down are configured by your organization in the Admin module.
Once selected, click Add.

Add Approver
A modal window opens.

Use the Approver Type drop-down menu to select whether the approver will be an Individual Approver or Approval Group.
Begin entering the name of the individual or group into the Approver field.
The system will automatically retrieve users or groups that match your entered text.
At least two or more characters will need to be entered for the system to retrieve results.
Use two asterisks ** to retrieve a complete listing.

Select the desired name or group.
Click Select.
The user or group will be added as a row to the Contract Type Approver page.
Total Contract Value LImit
The Total Contract Value Limit field will be displayed next the to added approver or approval group.

The Total Contract Value Limit field displays blank by default and needs to be completed by you.
Enter a numeric value in the Total Contract Value Limit.
The numeric value entered in the Total Contract Value Limit field serves as a trigger or threshold for that particular approver or approval group.
If the specific Contract Type is submitted that exceeds the entered amount, the approval workflow will be launched and the contract sent to the approver or approval group for approval or rejection.
A zero dollar amount may be added.
Repeat above steps to add another approver or approval group.
To create a chain workflow, multiple approvers or approval groups must be added.
See workflow chain topic below.
NOTE: Approvers must be sorted in ascending order by approval limit. To make it easy, use the drag and drop method to place approvers in the correct order.
Key Points Relating to Total Contract Value Changes:
-
If an approver changes the Total Contract Value on the contract, this may result in approvers being added or removed from the approval chain.
-
In this scenario, to accommodate the above approver changes and ensure the correct signatory approvers are included in the DocuSign envelope, the contract signing process will start over again at the beginning of the re-calculated approval chain.
-
e-Sign Enabled
As mentioned in the NOTE above, the e-Sign Enabled column will only be active and configurable at the approver level, if it was enabled on the Contract Workflow page for the Contract Type Approver workflow rule. Use this setting to determine which approvers will simply approve and which approvers will electronically sign.

Repeat this process for each sequence/trigger to be configured.
Using the above configured Contract Type Approver workflow shown in the example image above, a created OGA Contract Type that exceeds $5000 is sent to both Mary and Patrick for approval.

Notice that Patrick was enabled as a signatory (e-SIgn Enabled) on this Contract Type.

Save
Be sure to click Save to commit all changes.
Delete
Select Delete to remove the workflow sequence.
The following confirmation message displays:
Click Cancel to exit the message; existing workflow sequence remains intact.
Click OK to proceed with deleting the workflow sequence setup.