Credit Memo - Attachments
The third step in the Credit Memo creation process is Attachments.
This step is optional.
The Documents page opens:

The following details are pulled in from the Credit Memo - Header Information page and may not be edited during this step.
-
Buyer Credit Memo No.
-
Supplier
-
Supplier Credit Memo #
Click the Vendor Profile ![]() icon to view detailed information about the supplier.
icon to view detailed information about the supplier.
Add Document
To attach documents to the invoice, click the Add Document link.
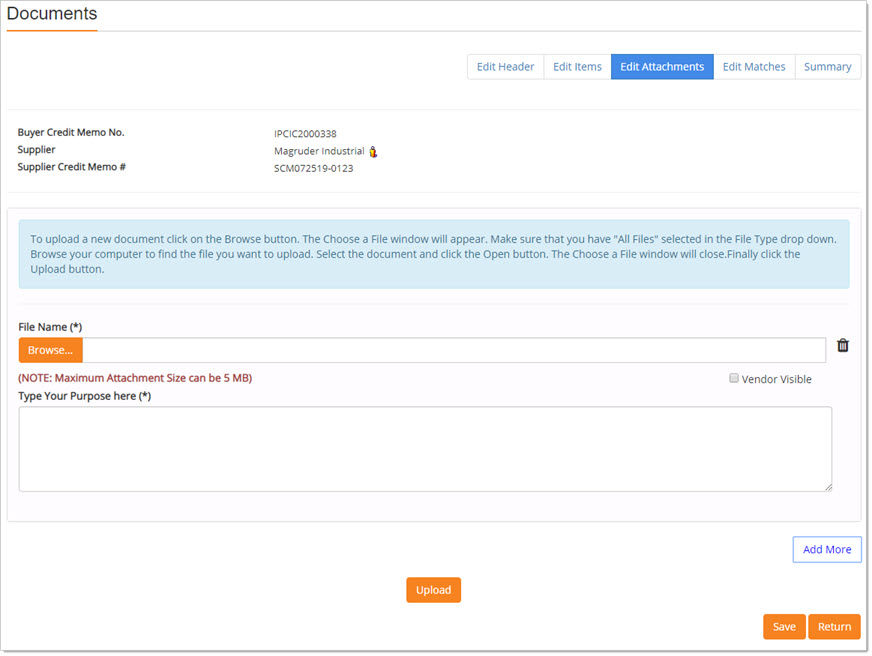
The Documents page will refresh to display a new section:

NOTE: Please do not attach files with the following characters in their name: forward slash(/), back slash(\), percentage (%), square brackets ([]), ampersand(&), question mark (?), colons (:), greater than (>), less than (<), quotes ("), pipes (|), asterisk (*), pound (#), power of (^)
Click Browse or Choose File, depending on your browser, to navigate to the local or network location of the document to be attached.
Highlight the file name and click Open.
The name of the selected document will display in the File Name field.
NOTE: The maximum file size allowed for an attachment is 5MB.
Type Your Purpose Here
Enter a reason for or description of the attachment. The Type your purpose here text box is required.
Vendor Visible
To allow the vendor to have access to the attachment, check the Vendor Visible check box.
Upload
When finished, click Upload.

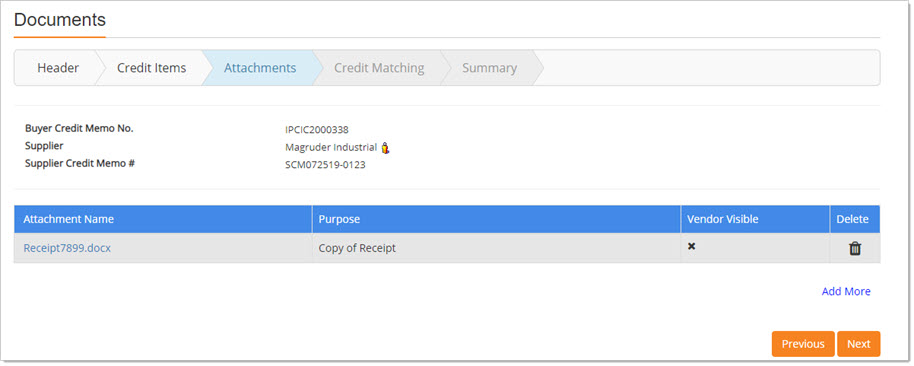
The application returns to the Credit Memo - Attachments step.
The attached file displays as an active hyper link. Select the link to download and view the attachment.
If the document was marked as Vendor Visible, a black X will appear in the column.
Actions
|
Option |
Icon |
Resulting Action |
| Delete |
|
Select Delete to remove a particular attachment. Be advised, this action is instant. If you select Delete, the attachment will be immediately removed. |
Add More
To add another attachment, click the Add More link and repeat the above steps.
Next
When all attachments have been added to the invoice, click Next to proceed to the optional Credit Matching step.
Discard Draft
Click Discard Draft if you wish to exit the Credit Memo creation process without continuing.
A confirmation message will display:

Click Yes to proceed with discarding the changes. You will return to the Invoice/Credit/Payment Voucher List page.
Click No to close message and return to creating the Credit Memo.