Create Payment Voucher
DOCUMENTATION NOTE: Be aware that some images and mentioned features may not reflect your organization's configuration and/or implementation.
Payment Vouchers are a simplified process of paying invoices for scenarios in which a Purchase Order is not present or required, while still capturing spend data. This shortcut method of payment is often used for service contracts and/or low-level purchases.
Key Points
-
This functionality must be enabled in the Enterprise Administration module.
-
Once enabled, the new Create Payment Voucher option will be accessible from the Invoice drop-down menu.
-
Any user who can create an Invoice may also create a Payment Voucher.
-
-
Payment Vouchers may be associated to a contract.
-
If Payment Voucher is not associated with a contract, you will need to select an accurate Commodity Code.
-
Payment Vouchers have their own workflow rules and re-approval rules.
-
Payment Vouchers can only have one associated vendor.
-
One Payment Voucher may be used to pay multiple invoices from the same vendor.
-
Payment Vouchers may only be used for items not requiring a Purchase Order.
It cannot include a mix of items with a Purchase Order and items without a Purchase Order. -
Negative line item amounts may be entered but Payment Voucher Total must be zero or greater.
Create Payment Voucher
Select Create Payment Voucher from the Invoice drop-down menu.

The application opens to the Create Payment Voucher page.

Complete Payment Voucher Header

Complete this section of the page as follows: (Required fields are marked with a red asterisk (*).
-
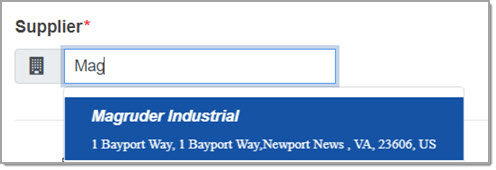
Supplier* - This field is required. The supplier must be in the system and only one supplier may be identified.
This field contains type-ahead functionality. As you enter in the supplier name, the system will display matching results.
Simply click to select the desired supplier.
-
Buyer Payment Voucher No.* - This field is read-only and required.
The sequentially assigned number will be based on the numbering format established in the Configure Documents > Invoice Numbering section of the Admin module. -
Payment Voucher Name* - This field is required.
By default, this field will populate with your user name followed by the Buyer Payment Voucher No.
You may edit this field as desired. This field accepts up to 50 alphanumeric characters. -
Justification - This field is optional. If Payment Voucher workflow is enabled, comments entered in this field will be visible to the approver or approvers when reviewing the document in their Approval Inbox.
-
Payment Indicator - Use the drop-down menu to select how the Payment Voucher will be paid.
Options will vary by organization. -
EFT Indicator* - This field is required.
Use the drop-down menu to select the appropriate Electronic Funds Transfer Indicator.
Options include:-
Yes
-
No
-
-
Check Category - Use the drop-down menu to select the appropriate Check Category .
Options will include the Check Category Code and will vary based on your organization.
Use the Search line to begin typing a Check Category, the system will retrieve a listing of matches for you to select from.
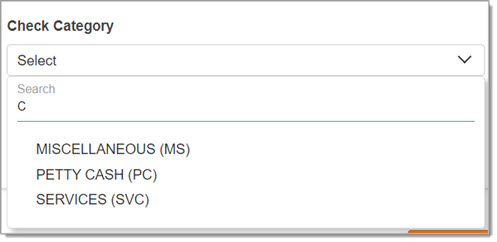
Please see your internal WebProcure Administrator for more information regarding the available values in this field. -
Receive Date* - This is a required field.
Use the calendar icon to select the date that the invoice was received.
Receive Date must be on or after the Issue Date. -
Post Date* - This is a required field.
Use the calendar icon to select
the date that the Payment Voucher was/will be recorded as a transaction.
icon to select
the date that the Payment Voucher was/will be recorded as a transaction. -
Issue Date* - This is a required field.
Use the calendar icon to select
the date that the invoice was issued by the supplier. -
Due Date* - This is a required field.
Use the calendar icon to select
the date that the invoice is due as indicated by the supplier.
Line Items
NOTE: You must choose a Supplier before you click Add Items.

The Line Items section of your new Payment Voucher is required as indicated by the red asterisk (*).
Click Add Items.
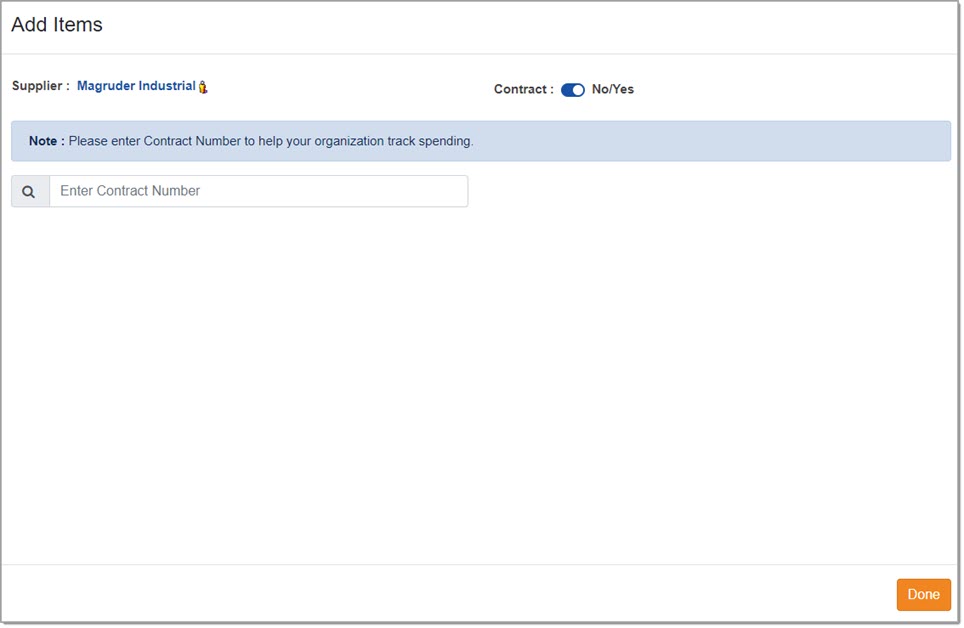
By default, the Supplier you selected when completing the Payment Voucher header information, will be displayed.
The Supplier may not be changed on this page, you would need to return to the Payment Voucher header to make that change.
The icon to the right of the Supplier Name  may
be selected to view detailed information about the supplier.
may
be selected to view detailed information about the supplier.
View sample image.
Contract - Yes
You have the option of associating the Payment Voucher with an existing contract.
This benefits your organization in tracking the spend and the amounts paid will be reflected in the Committed Contract Releases listing.
By default, the Contract toggle is set to Yes.
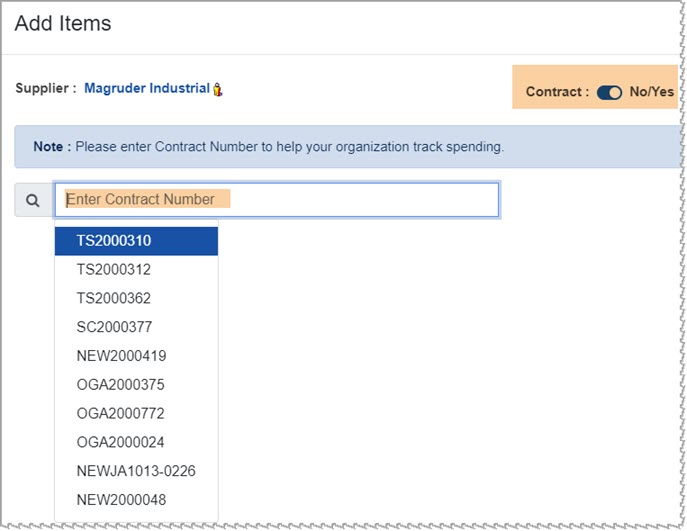
Click into the Enter Contract Number field.
The Enter Contract Number field is built on type-ahead functionality.
As you begin typing the Contract Number into this field, the system will retrieve matching results.
Simply click the appropriate Contract Number to select it.
The following confirmation message displays:
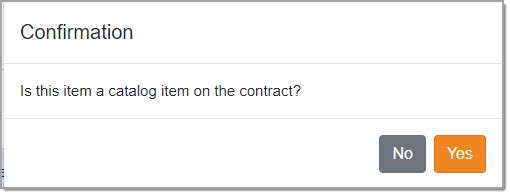
If the item you are entering the Payment Voucher for is for a catalog item on the selected contract, click Yes.
The items from the selected contract will display in a listing.
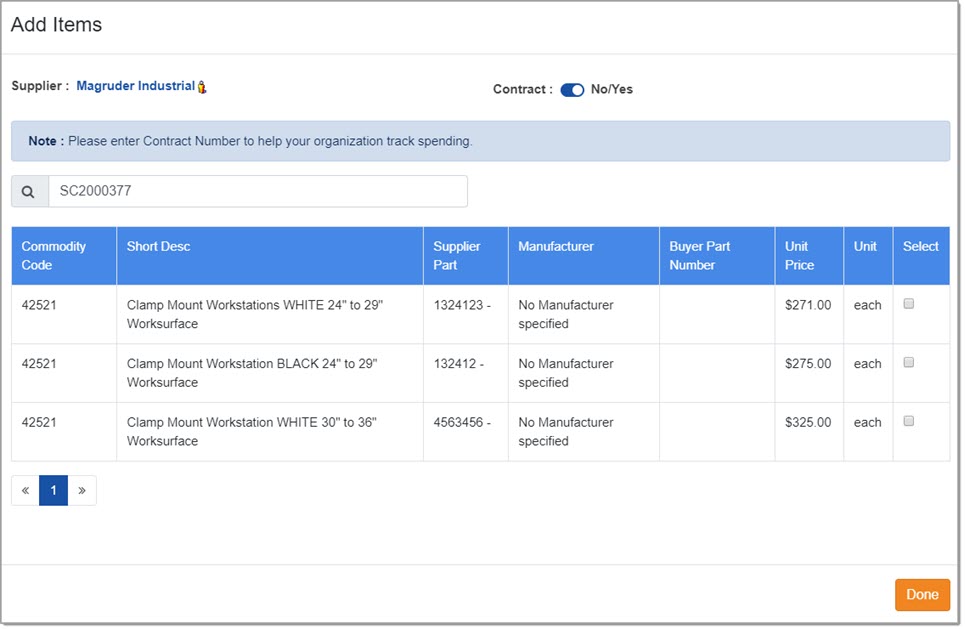
Displayed information includes:
-
Commodity Code
-
Short Description
-
Supplier Part
-
Manufacturer
-
Buyer Part Number
-
Unit Price
-
Unit of Measure
Use the check boxes in the last column to Select the items that are being paid for.
When finished making one or more selections, click Done.

Line Items
Each blue bar in the Line Items section indicates the Line Number.
To remove a line item, click the Remove Item link. Be advised that this action is immediate.
The following information is read-only:
-
Commodity Code: [Commodity Code Number] This is the Commodity Code of the item selected from the contract.
-
Contract Number: This field will display the Contract Number selected on the Add Items modal window.
The Contract Number field is an active hyperlink and may be selected to open and view the Contract Summary. -
Line Amount: This value will calculate automatically as Quantity * Unit Price.
-
Description: This is the Description of the selected line item. This is read-only.
-
Supplier Invoice No.* - This field is required. Enter the Supplier's Invoice Number.
Each line item may have different Supplier Invoice No. in order to use a single Payment Voucher to pay multiple supplier invoices.
-
Quantity - Enter the Quantity of the line item that you are acknowledging payment for. This is a required field.
-
Unit Price - This field is read-only. It displays the Price from the selected item/contract.
-
Unit Measure - This field is read-only. It displays the Unit of Measure from the selected item/contract.
-
Manufacturer - This field is read-only.
It displays the Manufacturer name, if any, from the selected item/contract. -
Supplier Part Number - This field is read only.
It displays the Supplier Part Number, if any, from the selected item/contract. -
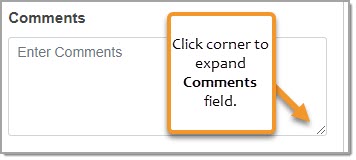
Comments - Use the Comments text box to enter in additional information about the line item.
This field accepts up to 2000 alpha numeric characters. Comments are optional.
Once you enter the Quantity and any Comments, click the Add Account Distributions button.
You will return to the Create Payment Voucher page. The Line Items section will reflect the information you entered.

Add Account Distribution
The Add Account Distribution button remains inactive until a value is entered into the Quantity field.
Click Add Account Distribution in each line item section to assign Cost Center distribution to each line item.
The Add Account Codes page opens.

Let's take a closer look at this page.
The first section is read-0nly and brings over all of the line item information you entered on the Create Payment Voucher page.

Displayed information includes:
-
Quantity
-
Unit of Measure
-
Item Description
-
Contract Number, if applicable.
-
Manufacturer
-
Supplier
-
Supplier Part Number
-
Unit Price
-
Line Amount
The second section is where you select one or more Cost Centers and allocate the total Line Amount by Amount, Percentage, or Quantity.
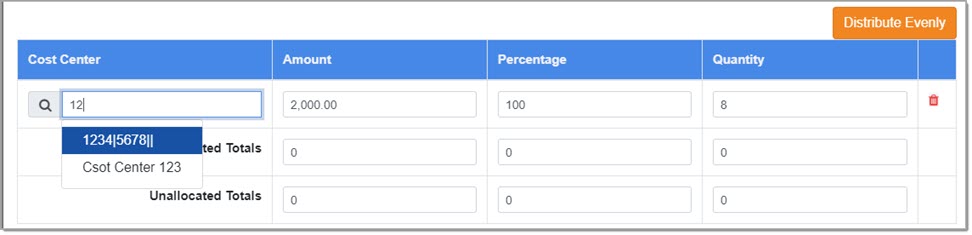
Complete the second section as follows:
-
Cost Center - To search for the correct Cost Center to use, begin typing the Cost Center code.
The system will retrieve matching results.
To retrieve a complete listing of Cost Centers, enter two asterisks (**).
Click the correct Cost Center to select.
To add more than one Cost Center, click the Add More button
Repeat this process for each Cost Center to be added.

-
Amount, Percentage, Quantity - By default:
-
The total Line Amount value is displayed in the Amount field.
-
The Percentage value is 100%.
-
The Quantity value is the Quantity of the line item.
-
You may adjust the Amount, Percentage, and Quantity values as needed but know that the value must total 100%.
If you attempt to save when the Amounts, Percentage, or Quantity values do not equal the total value of the line item, an error message will display:
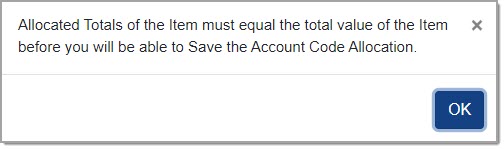
Click OK to return to Add Account Codes page and adjust entries as needed.
Distribute Evenly
Instead of manually entering values into the Amount, Percentage or Quantity, you may also opt to use the Distribute Evenly option.
This option distributes the percentage across all account codes evenly.
Save
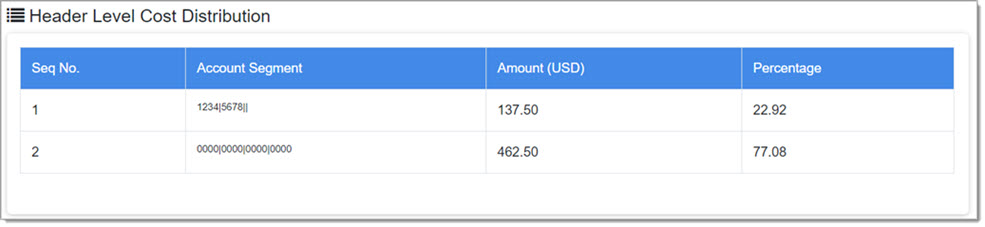
After you Save your entered Cost Center Allocations (Account Codes), you will return to the Create Payment Voucher.
The Cost Center allocation for the line item will update automatically and reflect the cost distribution of that line item.

Also, the Header Level Cost Distribution will update automatically and reflect the cost distribution of all line items that have had Cost Center Allocations applied.
![]()
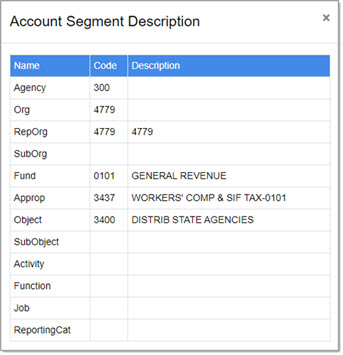
For those customers that utilize Account Segment Code functionality, those account codes may not necessarily be memorized or universally understood. Look for the information icon ![]() located next to the Account Segment Code on the following pages:
located next to the Account Segment Code on the following pages:
- Payment Voucher - View, Create, Edit
- Track Requests
- Track Orders
- Purchase Order History
- Approval Inbox
- Invoice Summary
- Invoice Items
- Request modal in Document Cross Reference View
- PO modal in Document Cross Reference View
Click the icon to ![]() to view a modal window with the account code details. See example image below:
to view a modal window with the account code details. See example image below:
![]()
Continuing our process of building the Payment Voucher.
Totals
After entering line items and account codes, the Totals section will reflect the current Payment Voucher Amount total.

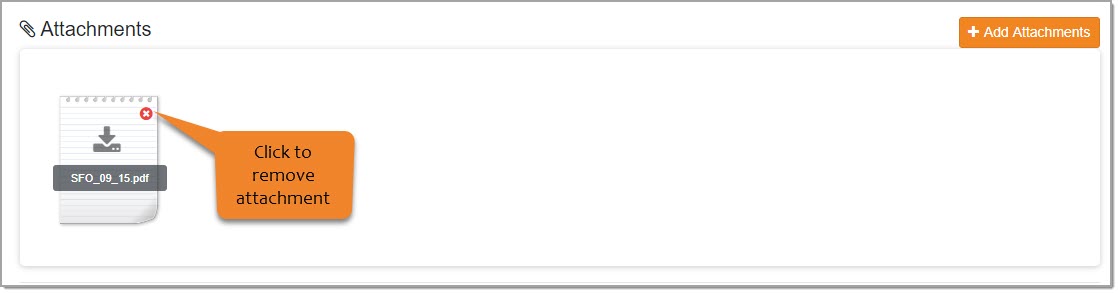
Attachments
If desired, you may upload supporting documentation such as an electronic copy of the invoice, packing slip, etc.

Click Add Attachments.
NOTE: Please do not attach files with the following characters in their name: forward slash(/), back slash(\), percentage (%), square brackets ([]), ampersand(&), question mark (?), colons (:), greater than (>), less than (<), quotes ("), pipes (|), asterisk (*), pound (#), power of (^)
Click Browse or Choose File, depending on your browser, to navigate to the local or network location of the document to be attached.
Highlight the file name and click Open.
The name of the selected document will display in the Attachments section.
Repeat the above process for each attachment to be added.
If needed, click the red x to remove the attachment.
Be advised that this action is immediate.
Save
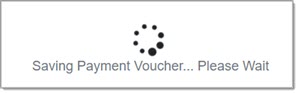
Once your Payment Voucher is complete, you may click Save.
The system will display the following active message.
See complete saving and submittal topic below.
Contract - No (Commodity)
You have the option of associating the Payment Voucher with an existing contract.
If it is not associated with a contract, click the Contract toggle to switch the value to No.
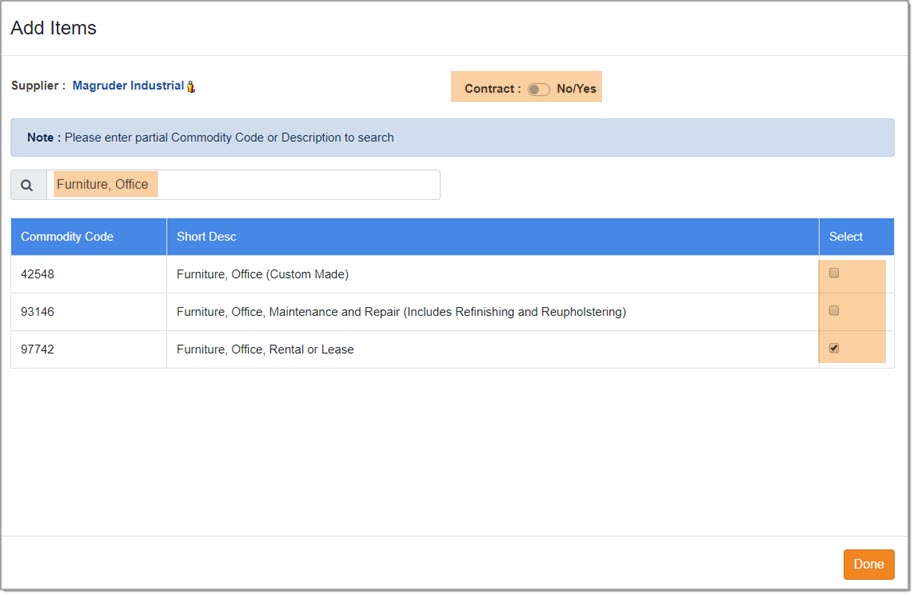
Once the Contract toggle is set to No, the page will refresh to show new instructions.
The NOTE will change to: Please enter partial Commodity Code or Description to search.
Enter a partial or full Commodity Code or Commodity Description.
The system will display matching results.
Check one or more Select boxes next to the Commodity or Commodities that represent the items you are entering a Payment Voucher for.
Repeat these steps for each Commodity that represents the items you are entering a Payment Voucher for.
Once all Commodities have bee selected, click Done.
You will be redirected to the Create Payment Voucher page and the Line Items section will populate with a Line Number for each Commodity selected.

Each blue bar in the Line Items section indicates the Line Number.
To remove a line item, click the Remove Item link. Be advised that this action is immediate.
The following information is read-only:
-
Commodity Code: [Commodity Code Number]
-
Contract Number: This field will display as N/A when items are not associated with a contract.
-
Line Amount: This value will calculate automatically as Quantity * Unit Price.
The remaining Line Item fields are completed as follows:
-
Description: This is the Commodity Description that is associated with the Commodity Code.
You may edit the Description as needed. See Edit Description topic below. -
Supplier Invoice No.* - This field is required. Enter the Supplier's Invoice Number.
Each line item may have different Supplier Invoice No. in order to use a single Payment Voucher to pay multiple supplier invoices. -
Quantity* - Enter the Quantity of the line item that you are acknowledging payment for.
This field is required. -
Unit Price* - Enter the Unit Price of the line item that you are acknowledging payment for.
This field is required.
You may also enter a negative value to indicate a Payment Voucher Discount amount.
See Totals section below for an example. -
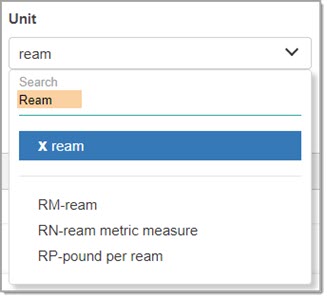
Unit* - Enter the abbreviated code for Unit of Measure. This field is required.
To search for a correct code to use, click into the Search field and begin entering text.
The system will retrieve matching results.
Click the correct Unit to select.
-
Comments - Use the Comments text box to enter in additional information about the line item.
This field accepts up to 2000 alpha numeric characters. Comments are optional.
-
Manufacturer - Enter the name of the Manufacturer of the line item. This field is optional.
-
Supplier Part Number - Enter the complete Supplier Part Number of the line item. This field is optional.
Add Account Distribution
The Add Account Distribution button remains inactive until a value is entered into the Quantity field.
Click Add Account Distribution in each line item section to assign Cost Center distribution to each line item.
The Add Account Codes page opens.
Let's take a closer look at this page.
The first section is read-0nly and brings over all of the line item information you entered on the Create Payment Voucher page.
Displayed information includes:
-
Quantity
-
Unit
-
Item Description
-
Contract Number
-
Manufacturer
-
Supplier
-
Supplier Part Number
-
Unit Price
-
Line Amount
The second section is where you select one or more Cost Centers and allocate the total Line Amount by Amount, Percentage, or Quantity.
Complete the second section as follows:
-
Cost Center - To search for the correct Cost Center to use, begin typing the Cost Center code.
The system will retrieve matching results.
To retrieve a complete listing of Cost Centers, enter two asterisks (**).
Click the correct Cost Center to select.
To add more than one Cost Center, click the Add More button
Repeat this process for each Cost Center to be added.
-
Amount, Percentage, Quantity - By default:
-
The total Line Amount value is displayed in the Amount field.
-
The Percentage value is 100%.
-
The Quantity value is the Quantity of the line item.
-
You may adjust the Amount, Percentage, and Quantity values as needed but know that the value must total 100%.
If you attempt to save when the Amounts, Percentage, or Quantity values do not equal the total value of the line item, an error message will display:
Click OK to return to Add Account Codes page and adjust entries as needed.
Distribute Evenly
Instead of manually entering values into the Amount, Percentage or Quantity, you may also opt to use the Distribute Evenly option.
This option distributes the percentage across all account codes evenly.
Save
When you have completed adding in the necessary Account Codes, click Save.
You will return to the Create Payment Voucher page.
The Line Items section will reflect the information you entered.
The Cost Center allocation for the line item will update automatically and reflect the cost distribution of that line item.

Also, the Header Level Cost Distribution will update automatically and reflect the cost distribution of all line items that have had Cost Center Allocations applied.
Continuing our process of building the Payment Voucher.
Account Segment Functionality
For those customers that utilize Account Segments versus Cost Center Allocation, the process to add Account Distribution is discussed in the Requests > View Request > Assign Account Distribution topic.
Visit the Assign Account Distribution topic for more information.
The following example image displays a line item for a company that utiizes Account Segment functionality.
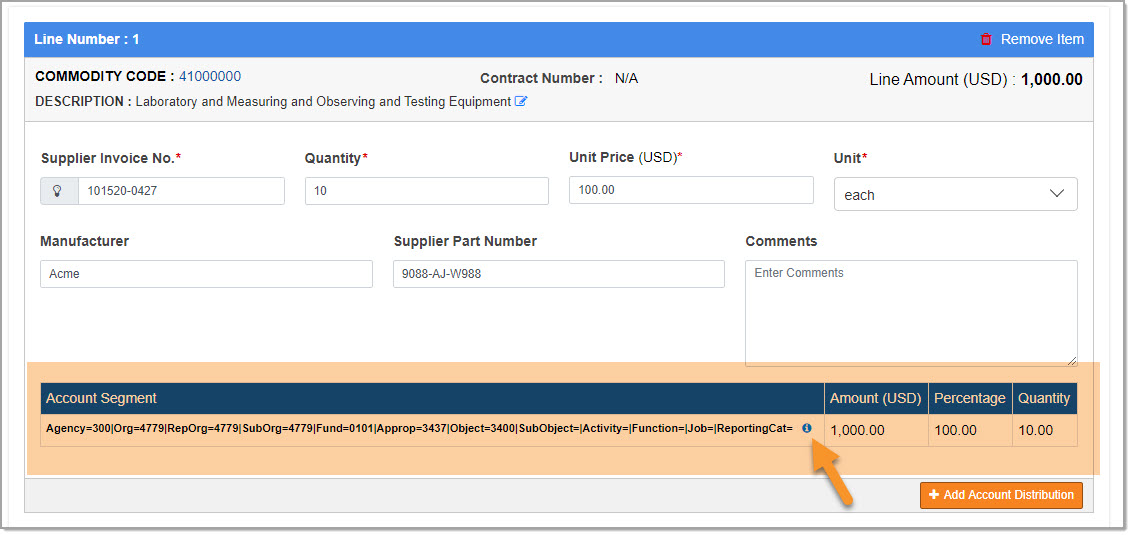
Notice the information  icon to view the details of the Account Segment.
Click the information icon to view the Account Segment Description.
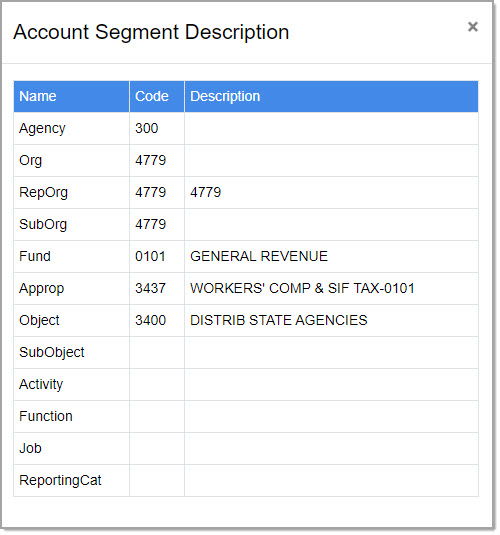
Click the X in teh upper right corner to close this modal window.
Edit Description
If necessary, click the Edit  icon located in the Commodity Description section to open the Edit Description modal window.
You may add to or edit the default Commodity Description as needed.
NOTE: The Edit icon will only be visible when creating a Payment Voucher for items not associated with a contract.
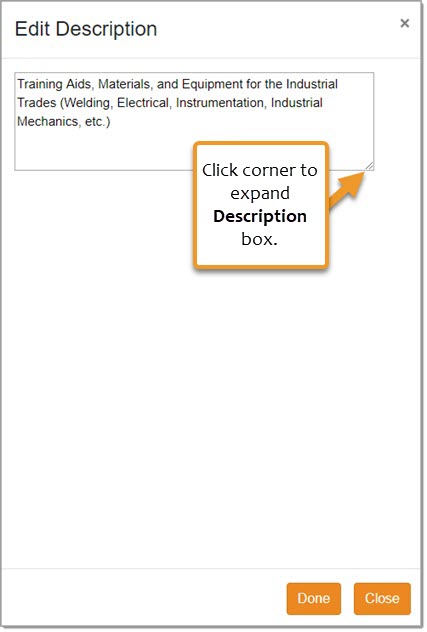
When finished, click Done.
Close will exit out of this window without saving changes.
Remove Item
To remove a line item, click the Remove Item link.

Be advised that this action is immediate.
Totals
After entering line items and account codes, the Totals section will reflect the current Payment Voucher Amount total.

Payment Voucher Discount
You may also enter a negative value in the Unit Price field to indicate a Payment Voucher Discount amount.
NOTE: Discounts may only be entered when creating a Payment Voucher for items not associated with a contract.
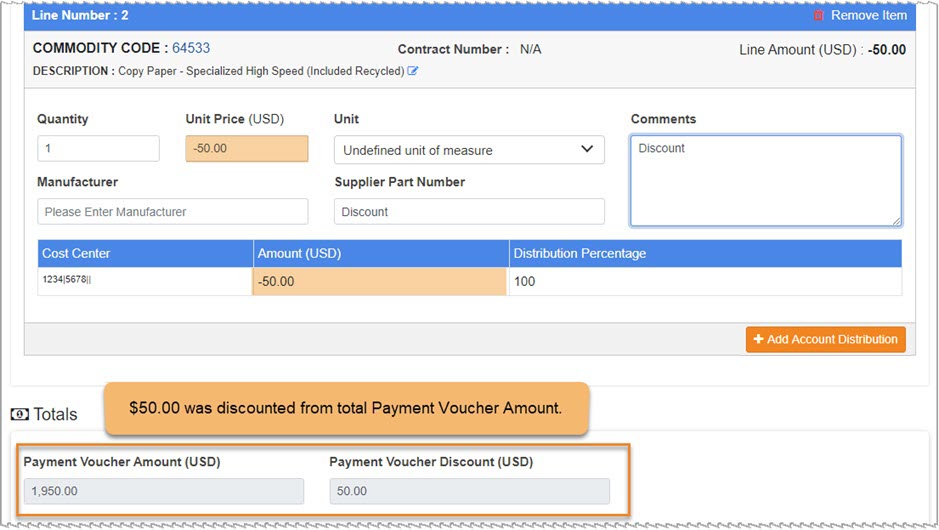
Using the above image as an example, a 50.00 discount was added by entering a -50.00 (negative) value in the Unit Price field.
The Totals fields shows the Payment Voucher Amount after the Discount amount was factored in.
Attachments
If desired, you may upload supporting documentation such as an electronic copy of the invoice, packing slip, etc.
Click Add Attachments.
NOTE: Please do not attach files with the following characters in their name: forward slash(/), back slash(\), percentage (%), square brackets ([]), ampersand(&), question mark (?), colons (:), greater than (>), less than (<), quotes ("), pipes (|), asterisk (*), pound (#), power of (^)
Click Browse or Choose File, depending on your browser, to navigate to the local or network location of the document to be attached.
Highlight the file name and click Open.
The name of the selected document will display in the Attachments section.
Repeat the above process for each attachment to be added.
If needed, click the red x to remove the attachment.
Be advised that this action is immediate.
Discard PV Draft
If you wish to abandon the creation of the Payment Voucher, simply click Discard PV Draft at the bottom of the Create Payment Voucher page.
A confirmation message will display:
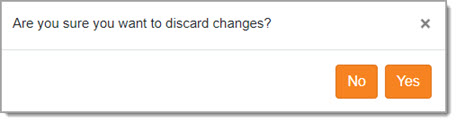
Click Yes to proceed with discarding your draft Payment Voucher.
Click No to return to the Payment Voucher and continue building it.
Save
Once your Payment Voucher is complete, you may click Save.
The system will display the following active message.
If you choose to Submit without saving, the status of the Payment Voucher will be Payment Voucher Created.
You may return to the Payment Voucher at another time to make edits and/or Submit.
Submit
Once your Payment Voucher is complete, click Submit.
Once submitted, if your organization, has one or more Payment Voucher approval rules enabled and your Payment Voucher triggers one or more of the workflows, then the status of your Payment Voucher will be Awaiting Approval.
-
Possible Payment Voucher approval rules:
-
User Spend Per Payment Voucher - If this rule is enabled, the Payment Voucher spend limits and approvers are configured in your user profile. The workflow will launch if your Payment Voucher total exceeds your designated limits.
-
Commodity Spend Per Payment Voucher - If this rule is enabled and the Payment Voucher is not associated with a contract, then workflow can be configured against a Commodity Code. If the Payment Voucher amount exceeds the designated trigger amount for the specified Commodity Code, then it will required one or more approvers.
-
Contract Release Payment Voucher - If this rule is enabled, the Contract Release Payment Voucher spend limits and approvers are configured in your user profile. The workflow will launch if your Payment Voucher total exceeds your designated limits.
-
If your organization does not utilize the Payment Voucher approval rules or if your Payment Voucher does not trigger one or more of the workflows, then the status of your Payment Voucher will be Approved.
Be advised of other scenarios upon submittal:
-
For those customers that are in an integrated environment where they are connected to their own ERP system, the Payment Voucher will display as Fin System Pending after workflow is complete. The Payment Voucher will follow the same status flow as Invoices.
-
For those customers that are not in an integrated environment, the Payment Voucher will display as Approved.
History
Click the History button to view the history of the Payment Voucher.

Actions that were performed on the voucher are logged along with the user's name that performed the action and the date and time stamp of when it was performed.
Click Close to return to the Payment Voucher.