Home
DOCUMENTATION NOTE: Be aware that some images and mentioned features may not reflect your organization's configuration and/or implementation.
The home page is also the landing page once users log in. The links and information shown will vary based on your permissions and the modules implemented by your company.
To return to the home page at anytime, select the Home  icon located on the left end of the tool bar.

Let's take a closer look at this page.
Your company logo will display in the uppermost left corner.
Your current organization will appear in the upper right corner.
Cross-Reference Search
WebProcure tracks the life-cycle of a document from request to purchase order and through the process of receiving and invoicing.
At the top of the page, located to the left of your currently selected Organization, is the Cross-Reference Search field that allows you to search by document number or document name.

The results of this view, will display a listing of all related Requests, Purchase Orders, Invoices and Receipts that are associated with the entered document number or document name.
Please visit the Cross-Reference Search topic for additional information.
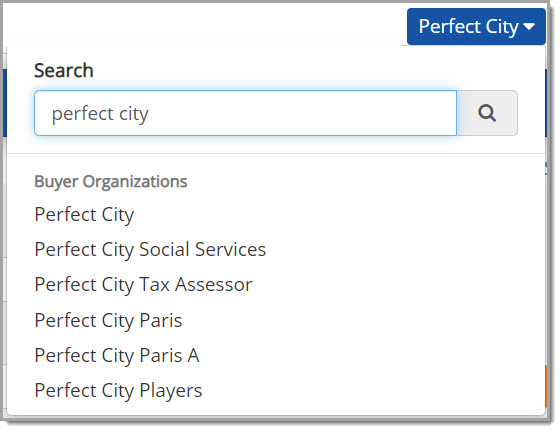
Organization Menu
Users associated with more than one organization may easily switch to another organization using the Organization menu.
Select your current hyper linked Organization name to view the drop-down menu as shown in the sample image below:

Users associated with more than five organizations , instead of a drop down list will be able to use the type-ahead search for Organization Name, which will allow a partial or full search of the name and narrow the results to show the applicable organization(s) to select.
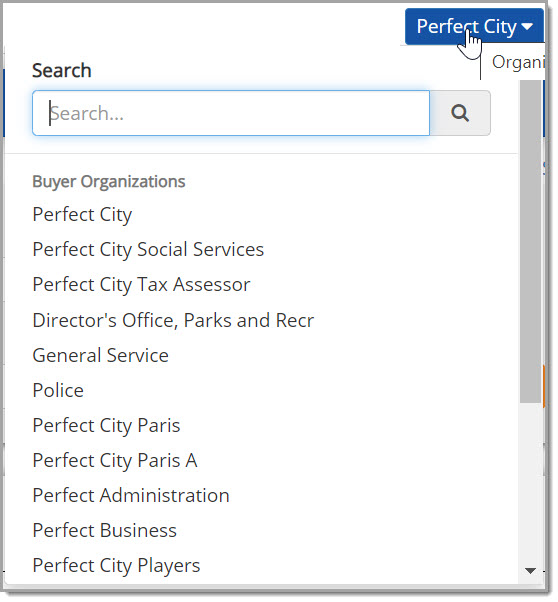
If preferred, you can still scroll through the entire list of organizations to select one.
Choose an organization from the menu to begin performing actions under that organization.
The home page will refresh to display the newly selected organization in the upper right corner. The menu bar options may also change depending on the permissions you have for that particular organization.
User Menu
Select your hyper linked Name to access and/or edit your individual profile, cleanly log out of the application, or access online help.

Your profile includes general contact information as well as the ability to change your password and set your default billing and shipping preferences.
Visit the My Account (Personal Information) topic for more information.
If you are reading this, then you are already in online help :) The Help link opens the latest version of searchable, indexed help. Online help includes video simulations that provide a demonstration of a particular concept or steps to accomplish a task and then allow you to practice what you have learned. Videos will be added or updated on a continuing basis.
Help topics are updated to coincide with each new product release and will reflect new product enhancements.
User Notification Center
Located to the right of your user name is the User Notification Center ![]() icon.
icon.
The number of new notifications that have not yet been read will display in red next to the User Notification Center  icon.
icon.
Select this icon for quick access to a compressed listing of all documents that have reached final approval stage or have been rejected. In addition, contract notifications relating to contract expiration, pending contract effective date, insurance and certificate expiration and percentage of total value reached.

The most recently approved, rejected or triggered documents will be displayed first.
Document records shown in grey have not yet been read.
Click the Mark all as read link to clear the alert notification (the number in red).
Selecting Close will collapse the listing.
Click the See More link to view additional information including the date/time stamp of when the document was accepted, rejected, or when a contract expires, etc. It all depends on the document type.

Click Close to close the details.
At the bottom of the compressed listing window, click the See All link to open the User Notifications page and view the complete listing.
Also, when you are logged in and actively using the system, and one of your documents is approved at the final stage or is rejected, a pop-up notification will display.
See example image below:

Tool Bar
![]()
To return to the home page at anytime, select the Home icon located on the left end of the tool bar.
The links on the tool bar will vary depending upon what your permissions are and which modules have been implemented by your organization.
The downward facing arrow  indicates that there is a drop-down menu available. Simply click the link to view the menu options.
News and Information
The body of the Home page consists of two sections: News and Information and My Links.
News and Information is located on the left side and may be used for customized, internal customer messaging.

The information shown here is managed in the Enterprise Administration section of WebProcure. Users with WebProcure Administrative privileges can enter text, images, and hyper links that will display on the Home page.
For more information on how to create the text that is displayed on the Home page, please visit the Edit General Org Info topic.
My Links
Located on the right side of the body of the Home page is the My Links section.
You may create a listing of frequently accessed websites that may be opened directly from inside WebProcure.
Once selected, the link will open in a new browser window/tab.

Add New Link
To enter a new link, click the Add New Link button.
The page will refresh to display an additional field.

Enter a valid URL including the prefix of http:// or https:// as needed. For example, to add Google as a link, enter: http://www.google.com.
Once entered, click the Save Link  icon to save entry. The page will refresh to display the newly added URL.
Click the hyper linked URL to access the website.
Remove Link
To remove a link from the My Links section, click the Remove Link  icon located on the same line as the URL that is to be removed.
The following confirmation message will display:

Click OK to proceed with removing the link.
Select Cancel to end the removal process; the link will remain active in your My Links section.
Dashboard
IMPORTANT: The Dashboard component on the home page of WebProcure must first be enabled by your application's Administrator in the Admin module. The second step is to obtain and enter your organization's custom URL, which is also entered in the Admin module. Your WebProcure Administrator will need to contact their Proactis Customer Operations Manager for assistance in getting the required URL for your Dashboard.
The Dashboard displays the result set of several custom and standard reports into a single, integrated view. By combining different types of related content, you can create a data-rich dashboard that quickly conveys trends. Please see the important message above regarding enabling of the Dashboard.

View more details in the Dashboard topic.